
- 首页
- About
- Products
- Download
- Support
- Applications
CNC Development Manual
How the interface displays text, values, and status
Download the bilingual offline manual (ZIP, 8.7 MB; original-resolution screenshots included)
The previous chapter used
#810to explain how the three tabs under Program switch pages. This chapter stays on that screen and asks: where does the word Program come from, why do the coordinate fields show three decimal places, why does the upper-right label say Simulation, and why is its background red?All of these features belong to the existing standard configuration. This chapter reads existing files and observes existing pages, without adding buttons or parameters. By the end, you should be able to trace a display field to the parameter it reads and explain what determines its text, numeric value, option text, and appearance.
1. Find these three positions first
Open Program → Toolpath Preview and look at the complete page below.
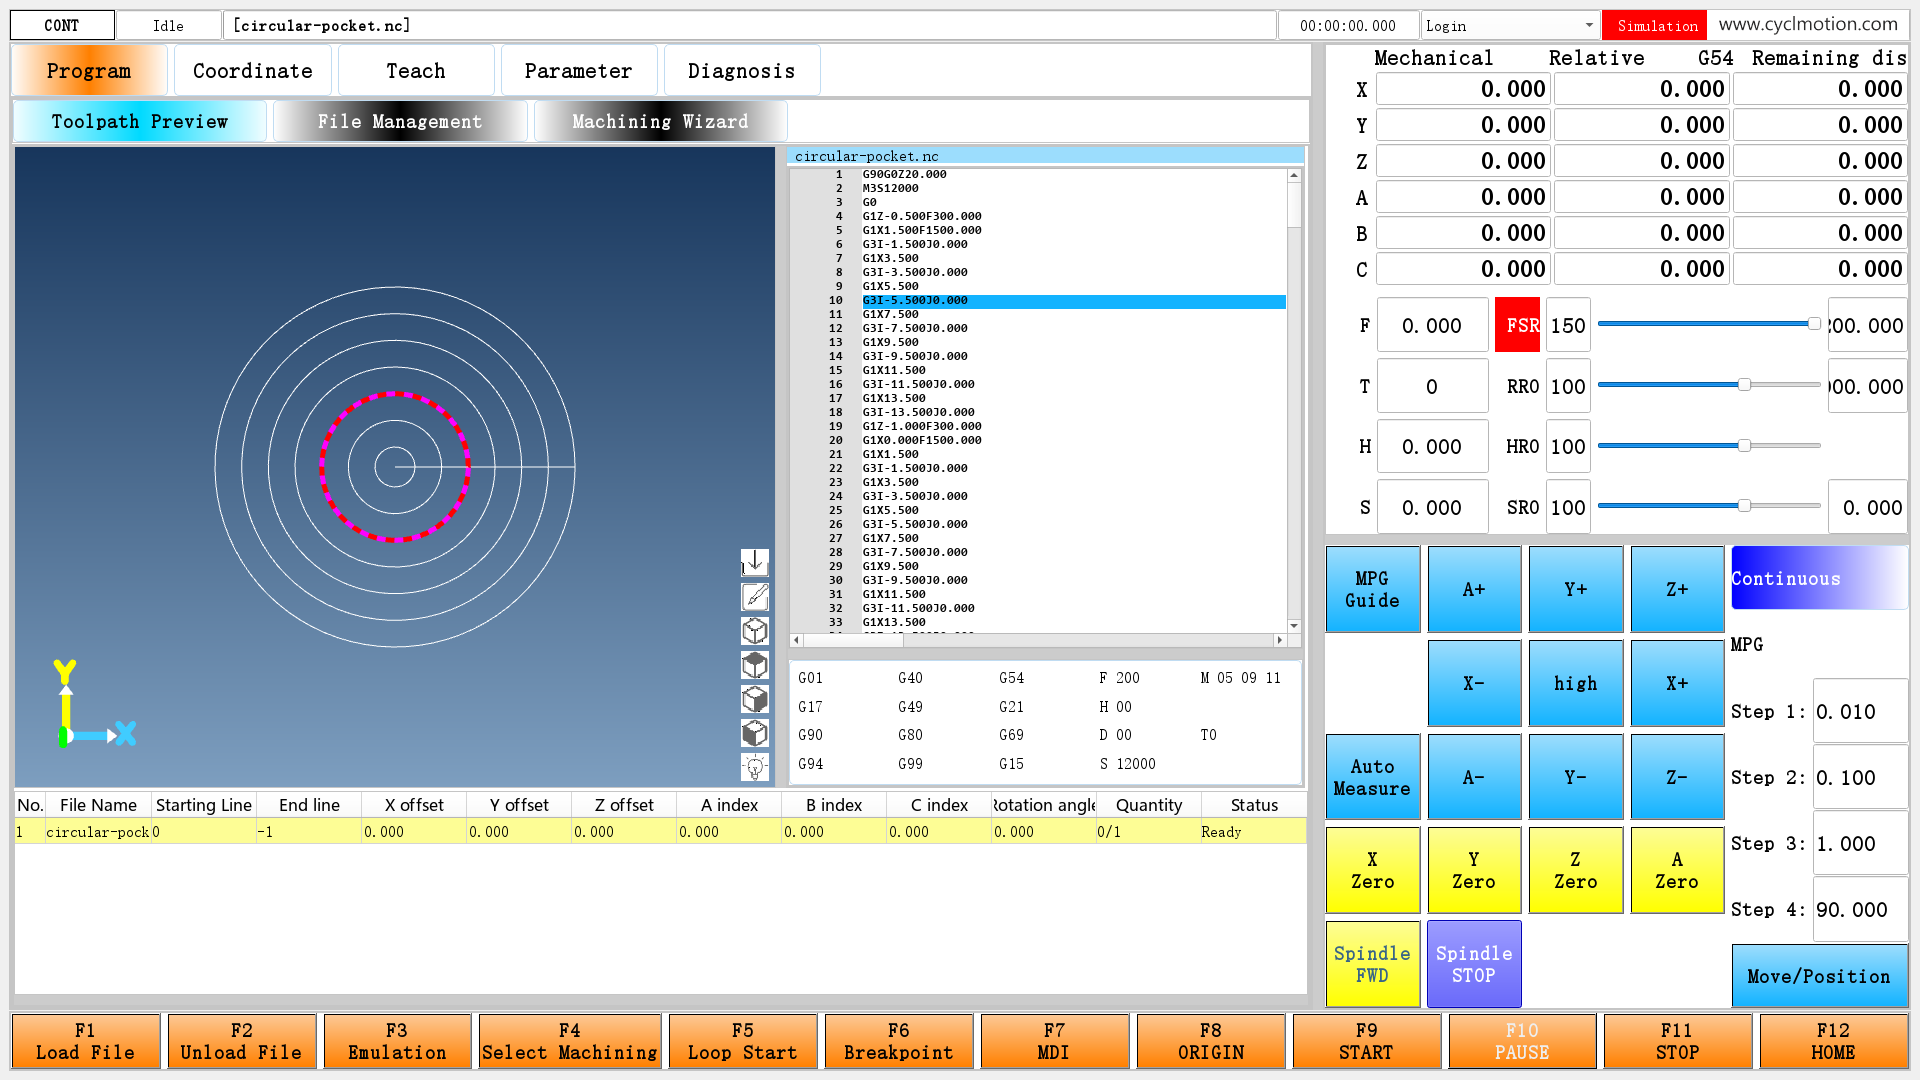
Click the screenshot to enlarge it. Full-resolution screenshots are included in the offline package.
Figure 1. The standard Program page. The left area shows the toolpath for circular-pocket.nc; the program text is alongside it. This chapter focuses on Program and File Management at the upper left, the Mechanical column on the right, and the white Simulation text on a red background at the upper right. Coordinates are offline display values; machining has not been started.
Where to look What appears on screen What to understand Main-page entries at the upper left and tabs in the next row Program, Toolpath Preview, File Management How the page gets these names and how a different language supplies different text The Mechanical column on the right Values for X, Y, Z, and the other axes Which parameter is read and how signs and decimal places are displayed The upper-right status label Simulation on a red background How a numeric state becomes text and which separate condition controls the color All three use
-T(...), but the contents of the parentheses differ, so the displayed results differ. Follow the actual positions first; there is no need to memorize every UI attribute at the start.Coordinates and values in the screenshots are examples. Follow the configuration of your software and machine.
2. Find the settings in the files
Open
env/maininterface/maininterface.uiin the software's working folder. You can view it in Qt Designer or search for control names in a text editor.Position on screen Control name in the file Control type Program entry label_39QLabel, a text labelFile Management tab label_45QLabelMechanical column heading label_23QLabelX mechanical-coordinate value lineEdit_10QLineEdit, configured as read-only hereY mechanical-coordinate value lineEdit_12QLineEdit, configured as read-only hereZ mechanical-coordinate value lineEdit_14QLineEdit, configured as read-only hereUpper-right Simulation status label_22QLabelContinue with the
accessibleDescriptionproperty. The system uses this property to specify displayed content, update requirements, and conditions. The status label's actual colors are defined instyleSheet. Both are the real property names used in the editor.The following files supply the text:
File Purpose in this chapter env/i18n/translatPack-0Chinese text and option names env/i18n/translatPack-1English text and option names env/i18n/languageLoads the appropriate language pack and arranges interface updates when the user changes language When explaining parameters below, we use full field notation such as
#1100.itemtitle[0]and#300.item[30]. UI attributes retain the original file's forms, such as#1100itemtitle0and#300.item30. Copy UI attributes exactly as shown; do not mechanically transfer script field notation into a UI attribute.3. How the word Program reaches the screen
Find
label_39. Its completeaccessibleDescriptionis:-T(#1100itemtitle0) -A: (clickedEvent:/env/programpage[0](#810permission=0)) -C1(#810permission==0) -C0(1) -DThe previous chapter explained clicking and selected appearances. Here, focus first on this line:
-T(#1100itemtitle0)It tells the label to get its displayed text from
#1100.itemtitle[0]. This is the name of item 0, not the value of#1100or the value of#1100.item[0].The Chinese language pack,
env/i18n/translatPack-0, contains:#1100.itemtitle[0]="程序"The corresponding line in the English pack,
env/i18n/translatPack-1, is:#1100.itemtitle[0]="Program"Both files write to the same field. One supplies the Chinese name, and the other supplies Program. The original label keeps reading that field, allowing both languages to use the same UI file.
File Management uses the same method. The following line is an excerpt from the display settings of
label_45; its complete click settings are in the previous chapter:-T(#1100itemtitle6)The Chinese pack assigns:
#1100.itemtitle[6]="文件管理"The English pack assigns:
#1100.itemtitle[6]="File Management"You can now read the whole sequence:
The language script assigns the name → the label's
-T(...)reads it → the page displays that text.This also explains a common observation: you change a label's
textproperty in Qt Designer, but the old name returns when the software runs. These labels also obtain their text through-T(...)at runtime. To understand what actually appears, follow the referenced name field to the language pack.Editing a language-pack file on disk does not immediately change the current interface either. The assignments in that file must execute and update the text in memory before controls can display the new text. The standard language-change script also refreshes menus and tables and prepares some pages again. The language chapter will explain the complete customization procedure.
4. How a mechanical-coordinate value becomes displayed text
Find the X mechanical-coordinate field,
lineEdit_10. Its complete configuration contains just two lines:-T(#300.item30) -DThe first reads
#300.item[30]; the second requests continued display updates during operation. The field'sreadOnlyproperty istrue, so this position displays a coordinate rather than accepting a target position.For the current six-axis configuration, the mechanical-coordinate display fields are:
Axis Control name Display setting Field read X lineEdit_10-T(#300.item30)#300.item[30]Y lineEdit_12-T(#300.item31)#300.item[31]Z lineEdit_14-T(#300.item32)#300.item[32]Items 30, 31, and 32 are existing coordinate display fields. Their purposes are built into the software. You do not need to define them again, and you should not overwrite machine runtime parameters to reproduce the example values.
Why 12.5 appears as 12.500
The image below uses the same native coordinate area. The offline demonstration supplies
12.5,-3.25, and8for X, Y, and Z. The page displays them as follows: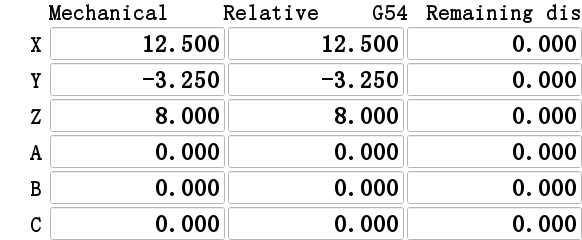
Click the screenshot to enlarge it. Full-resolution screenshots are included in the offline package.
Figure 2. The same controls from the coordinate area on the right of Figure 1, with another set of offline demonstration values. Focus on the Mechanical column: X is 12.500, Y is −3.250, and Z is 8.000. You do not need to move a machine or enter these numbers in the software to complete this lesson.
Numeric value to display Text in the image Rule illustrated 12.512.500The fractional part is padded to three places -3.25-3.250The minus sign is retained and the fractional part is padded to three places 88.000A real-number field uses decimal formatting even when its value is a whole number These coordinate items have the real-number type. The software produces text from the numeric value and display rules. A script does not need to append zeros to every value manually.
This real-number display path also checks
#330.item[8], a field associated with the default programming unit for linear axes. A value of0gives three decimal places; a value of1gives four. The Chinese and English packs provide the corresponding metric/imperial option text; the English options are mm and inch.Decimal places, length units, and machine accuracy are different things. This section explains text formatting only. Four displayed decimal places do not establish the machine's accuracy. The unit selection is also not merely a layout switch to change casually for a different number of decimal places. Unit conversion operations are outside this chapter.
This field's
-T(...)reads only the numeric value. It does not append mm or inch. Having a unit description in a parameter does not mean that every numeric field automatically displays it.Where the value comes from, and whether the page calculates coordinates
This mechanical-coordinate field directly reads a display value prepared by the system. The system updates coordinates according to its running state and prepares display values, which the page then reads.
-T(#300.item30)itself neither requests motion nor defines the workpiece origin.The adjacent column, called Relative in the English interface and 工件坐标 in Chinese, uses different settings involving coordinate offsets and input handling. Similar-looking fields do not necessarily have the same meaning or accept the same settings. This chapter concentrates on Mechanical; coordinate calculations and coordinate setting have their own chapter.
5. Why a state value of 1 displays Simulation
The upper-right
label_22obtains its text through:-T(#319.item11)It reads the value of
#319.item[11]but does not display a plain0or1. This item has the option type. The software uses its value as an option index and retrieves the corresponding text.The relevant two lines in the Chinese language pack are:
#319.itemtitle[11]="仿真?:"
#319.itemunit[11]="联机<<仿真"
Read the fields separately:
Field What it stores here Role in the upper-right label #319.item[11]Current option value, 0or1Decides which option to select #319.itemtitle[11]The item's name, supplied as Simulation? : by the English pack Names the parameter; the upper-right label does not read this field as its display heading #319.itemunit[11]Option text, supplied as Online << Simulation by the English pack Splitting at <<provides the text for options 0 and 1#319.itemtype[11]The option type built into the software Tells the software to look up text using the option index Option indices start at
0, giving:#319.item[11]Option selected Chinese display English display 0Option 0 联机 Online 1Option 1 仿真 Simulation The original English language-pack lines are:
#319.itemtitle[11]="Simulation? :"
#319.itemunit[11]="Online << Simulation"
The English option string contains spaces around the separator; preserve the original text when quoting it. Both languages use the same state value and UI control, with different option text.
Pay particular attention to reading
.itemunittogether with the parameter type. In numeric parameters it is often used for a unit description. In this option parameter it stores an option list. The word unit in the field name does not mean that all its contents describe millimeters, degrees, or spindle-speed units.The upper-right status is an existing built-in software state. Learning how it is displayed does not require changing its type or manually assigning its value. When reading another status label, follow the referenced value → the item type → the option text.
6. Why Simulation can have different background colors
First, look closely at the upper-right area from Figure 1:

Click the screenshot to enlarge it. Full-resolution screenshots are included in the offline package.
Figure 3. Simulation appears in white on red to the right of Login. The text reflects the simulation option; the red background comes from the disconnected condition. Text and color have separate sources.
The complete
accessibleDescriptionoflabel_22is:-T(#319.item11) -C2(#324_item12==0) -C0(#324_item12==1&Ŀ.item11==0) -C1(#324_item12==1&Ŀ.item11==1) -DWe have already read the first line. Now read the three conditions in the middle:
Existing setting What it checks Selected appearance -C2(#324_item12==0)Controller connection state is 0, meaning disconnected2 -C0(#324_item12==1&Ŀ.item11==0)Connected and simulation option is 00 -C1(#324_item12==1&Ŀ.item11==1)Connected and simulation option is 11 &&means both conditions must be true.#324.item[12]is the built-in controller connection state. It is a different field from the simulation option in#319.item[11].The
2in-C2is an appearance number, not a universal code for red. This label's ownstyleSheetdefines the colors. Its content is shown below with indentation normalized:QLabel[style="2"] { color:rgb(255,255,255); background-color:rgb(255,0,0); } QLabel[style="1"] { color:rgb(0,0,0); background-color:rgb(255,255,0); } QLabel[style="0"] { color:rgb(0,0,0); background-color:rgb(0,255,0); }colorcontrols the text color, andbackground-colorcontrols the background. The complete display rules for this label are therefore:Connection state #324.item[12]Simulation option #319.item[11]English text Appearance 00Online 2: white text on red 01Simulation 2: white text on red, as in Figure 3 10Online 0: black text on green 11Simulation 1: black text on yellow This table explains the existing display conditions; it does not ask you to produce each state on a machine. The word Online alone does not establish that the controller is connected, and red alone does not tell you whether simulation is selected. Read the label's text and connection condition together.
When examining
-C0,-C1, or-C2on other controls, find the stylesheet those controls actually use. Their colors are defined by the control or its surrounding page. They are not three fixed colors used uniformly throughout the system.7. How -D keeps the display up to date
The controls above all have
-D. It requests continued updates to displayed text during operation, rather than reading the value only when the control is created.For the X mechanical-coordinate field, read the sequence as follows:
- When the page is created, it reads
#300.item[30]and formats it as a real number. - The system later updates that display field.
- During an interface update, the existing
lineEdit_10reads the field again and displays the new text.
In the offline check, this same control updated from
12.500to28.750without reloading the UI file. Figure 2 shows the first value; the second was used to check the update process.For the status label, an update reads the status text and evaluates the appearance conditions.
-Ddoes not connect a controller, run a language pack, or save parameters. Its purpose here is to make the display follow changes in data.Do not generalize this to “a control without
-Dcan never change.” Appearance conditions have their own update handling, and some operations explicitly refresh controls. For the continuously displayed text and numbers in this chapter, follow the existing-Dsettings.Updates also consider whether a control is visible or being edited. For example, you should not assume that each refresh overwrites text an operator is currently entering. The mechanical-coordinate field here is read-only. Input submission is outside this chapter.
8. Read one display position from start to finish
You can now explain the upper-right Simulation label in this order:
- Find
label_22in the main UI and read itsaccessibleDescription. -T(#319.item11)identifies item 11 of parameter 319 as the text source.- The item has the option type. Its current value,
1, selects option 1 from the option string. - The resulting text is Simulation in English and 仿真 in Chinese.
#324.item[12]is0, so-C2(...)selects appearance 2.styleSheetdefines appearance 2 as white text on red.-Dkeeps the text following later parameter changes; the appearance conditions are also checked during interface updates.
For Program, trace the name field. For a coordinate, trace the numeric field and real-number formatting. For a status, also trace the option text and appearance conditions. Read
-T(...)together with the control type, the referenced field, and the parameter type.The previous chapter also used
-T(811)onfileFrameto describe what content that area should load. The explanations for labels and numeric fields in this chapter cannot simply be applied to every type of control.9. Check the design and locate display problems
You can complete this lesson by reading files and observing the page. No runtime parameter edits are required.
Check What you should be able to explain Find label_39, then the corresponding assignments in both language packsProgram and its Chinese equivalent are assigned to the same #1100.itemtitle[0]fieldFind the two attribute lines and readOnlysetting oflineEdit_10It reads a coordinate display field, keeps updating, and is used as a read-only display here Find the attributes and stylesheet of label_22Text comes from the simulation option; color also depends on the connection state Compare the three uses of -T(...)You can distinguish the sources of names, numbers, and option text If the display is wrong, start here:
Symptom What to check first A textchange in Designer disappears at runtimeCheck whether -T(...)reads text from a parameter againThe page still shows old text after a language-pack edit Check which language file was edited, whether its assignments ran, and whether the control updated A number appears where a name was expected Check whether .item[...]or the parameter value was used instead of.itemtitle[...]A status label shows 0.000or1.000Check its referenced field, item type, and option text; do not change a built-in option item to a real-number type Simulation is correct but the color is unexpected Check the connection condition and appearance number separately, then find that appearance's colors in the stylesheet A number does not follow changes Confirm that the referenced display field changes, check -D, then consider visibility or active editingDecimal places differ from another environment Check the real-number display path and unit selection; do not equate display digits with machine accuracy A unit was assigned but does not appear beside the value Inspect which fields the control actually reads rather than assuming a unit is appended automatically You should now be able to answer: what does the page read, how does the software turn it into text, and when does it display it again? The next chapter follows these parameters into an existing parameter window: how its input rows are created and where user input is written back.
For the editable work coordinate field, continue with coordinate input handling: content selection, protection of typed text, and the different effects of Return, Esc and loss of focus.
Previous: Page switching · Next: Parameter windows · Reading guide
在线咨询 - Download
