
- 首页
- About
- Products
- Download
- Support
- Applications
CNC Development Manual
How the three tabs on the Program page work
Download the bilingual offline manual (ZIP, 8.7 MB; original-resolution screenshots included)
Open Program in the software. You will see three tabs: Toolpath Preview, File Management, and Machining Wizard. Clicking a tab changes the content below it.
This chapter explains this existing feature. By the end, you should be able to follow the page settings to the relevant script and explain what you clicked, which value changed, why a particular page appeared, and which file supplied its content.
You do not need to add parameters, buttons, or pages, or compile the software. The code below comes from the standard
env. We will look at how the three pages switch, without going into file operations or the machining calculations inside the wizard.1. Find the feature in the familiar interface
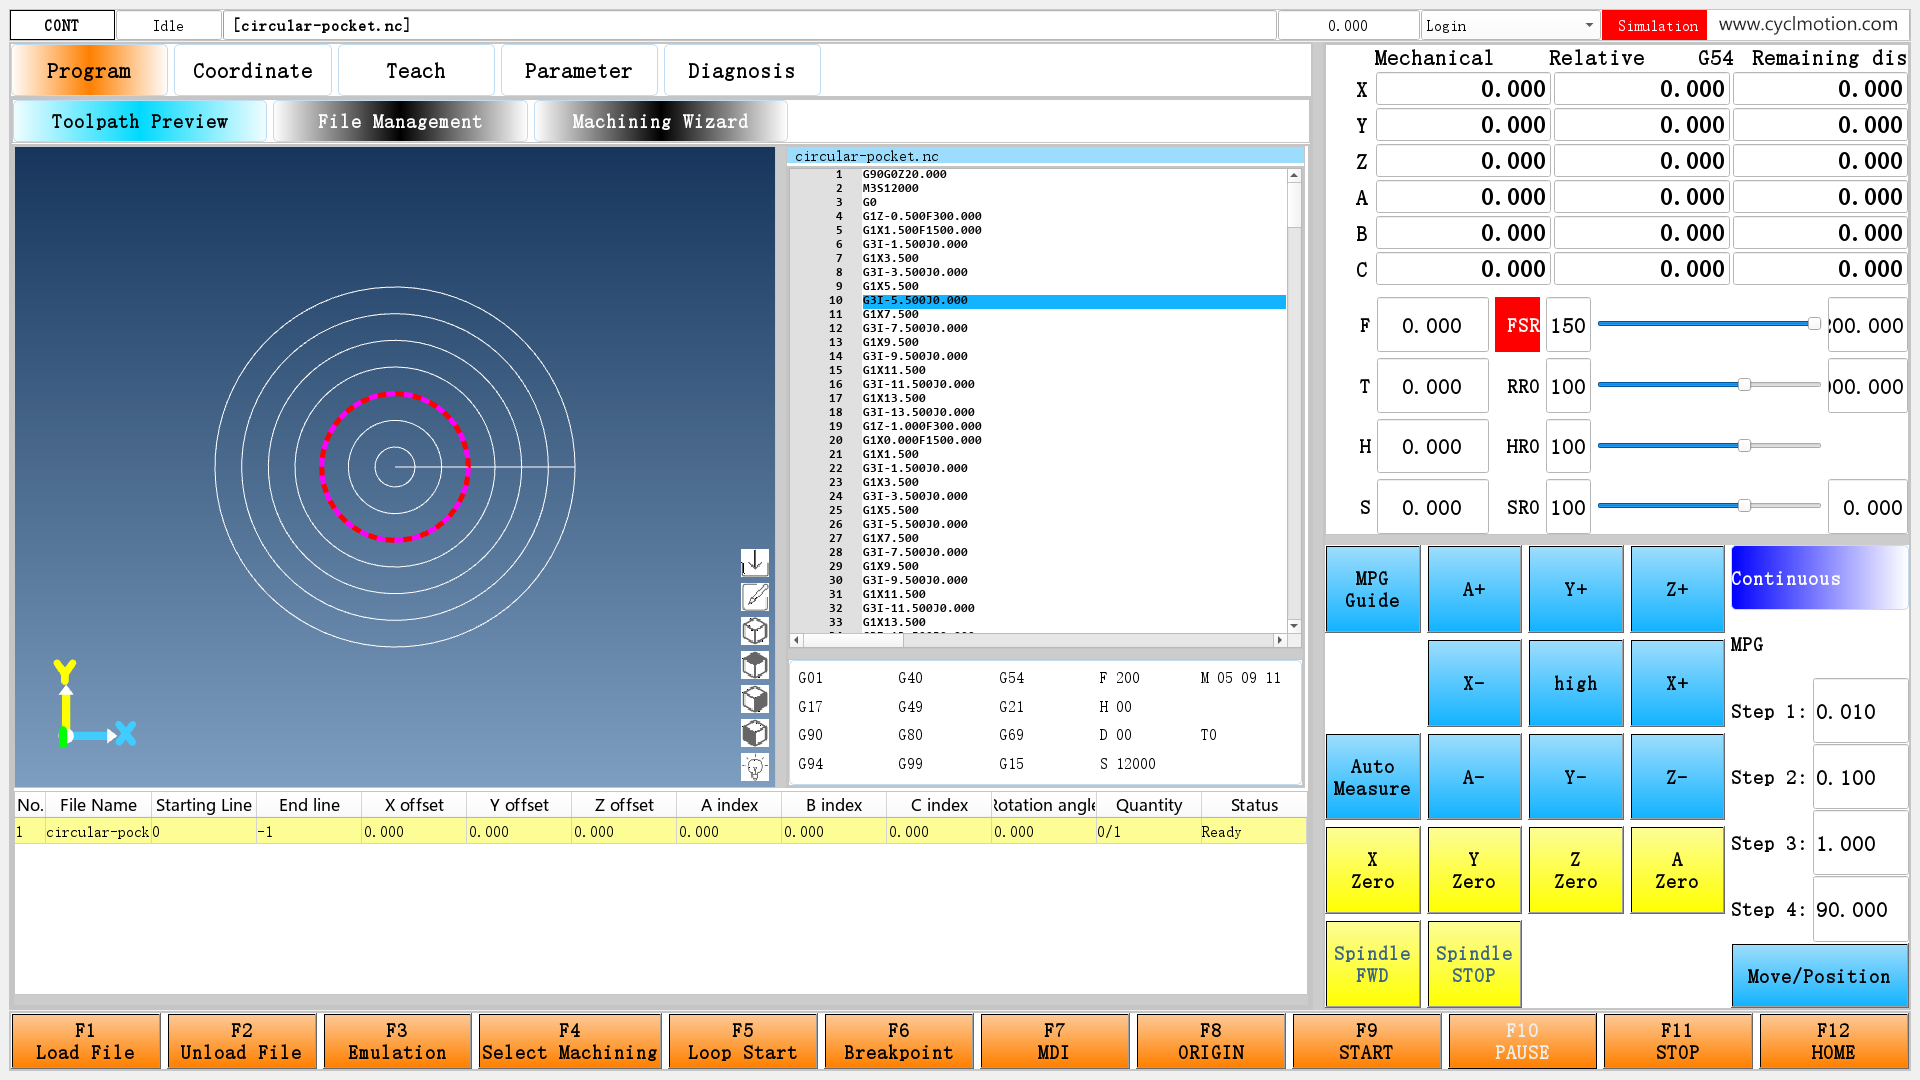
Click Program on the main screen. The next row contains the three tabs. Select Toolpath Preview first. The selected tab is light blue. Below it are the toolpath drawing area on the left, program text and G/M status on the right, and the machining file list underneath.
Click the screenshot to enlarge it. Full-resolution screenshots are included in the offline package.
Figure 1. Program → Toolpath Preview. The example file is circular-pocket.nc. The left area shows the circular toolpath from above; the right area shows the same file's program text, and the file appears in the list below. Line 10 is selected in blue, with its circle highlighted in alternating red and magenta. The red status label at the upper right reads Simulation. This is an offline preview; machine machining has not been started.
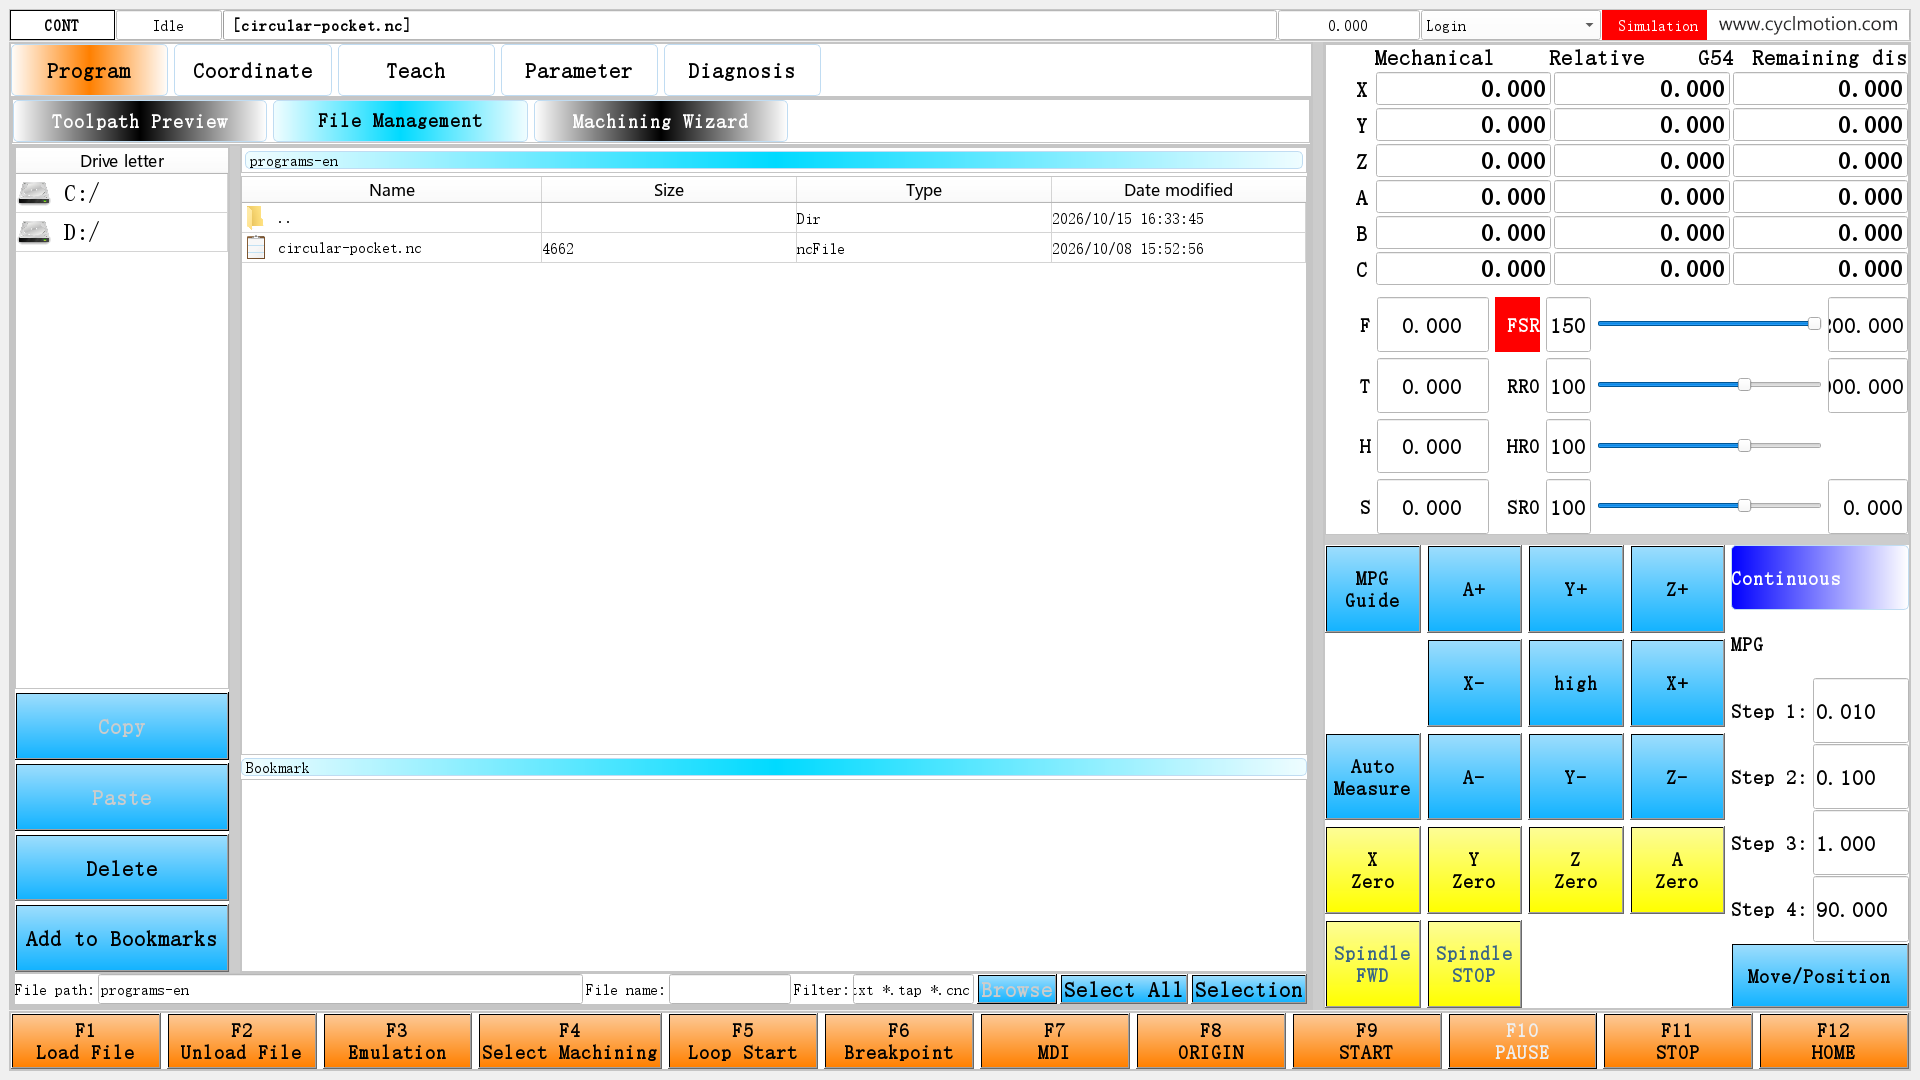
Next, click File Management. This tab turns light blue, and the area below changes to the drive and file lists. The coordinates and function buttons on the right, and the function keys at the bottom, stay in place.
Click the screenshot to enlarge it. Full-resolution screenshots are included in the offline package.
Figure 2. Open Program, then select File Management in the next row. The programs-en folder belongs to the software copy used for these images. Your file folder may be different.
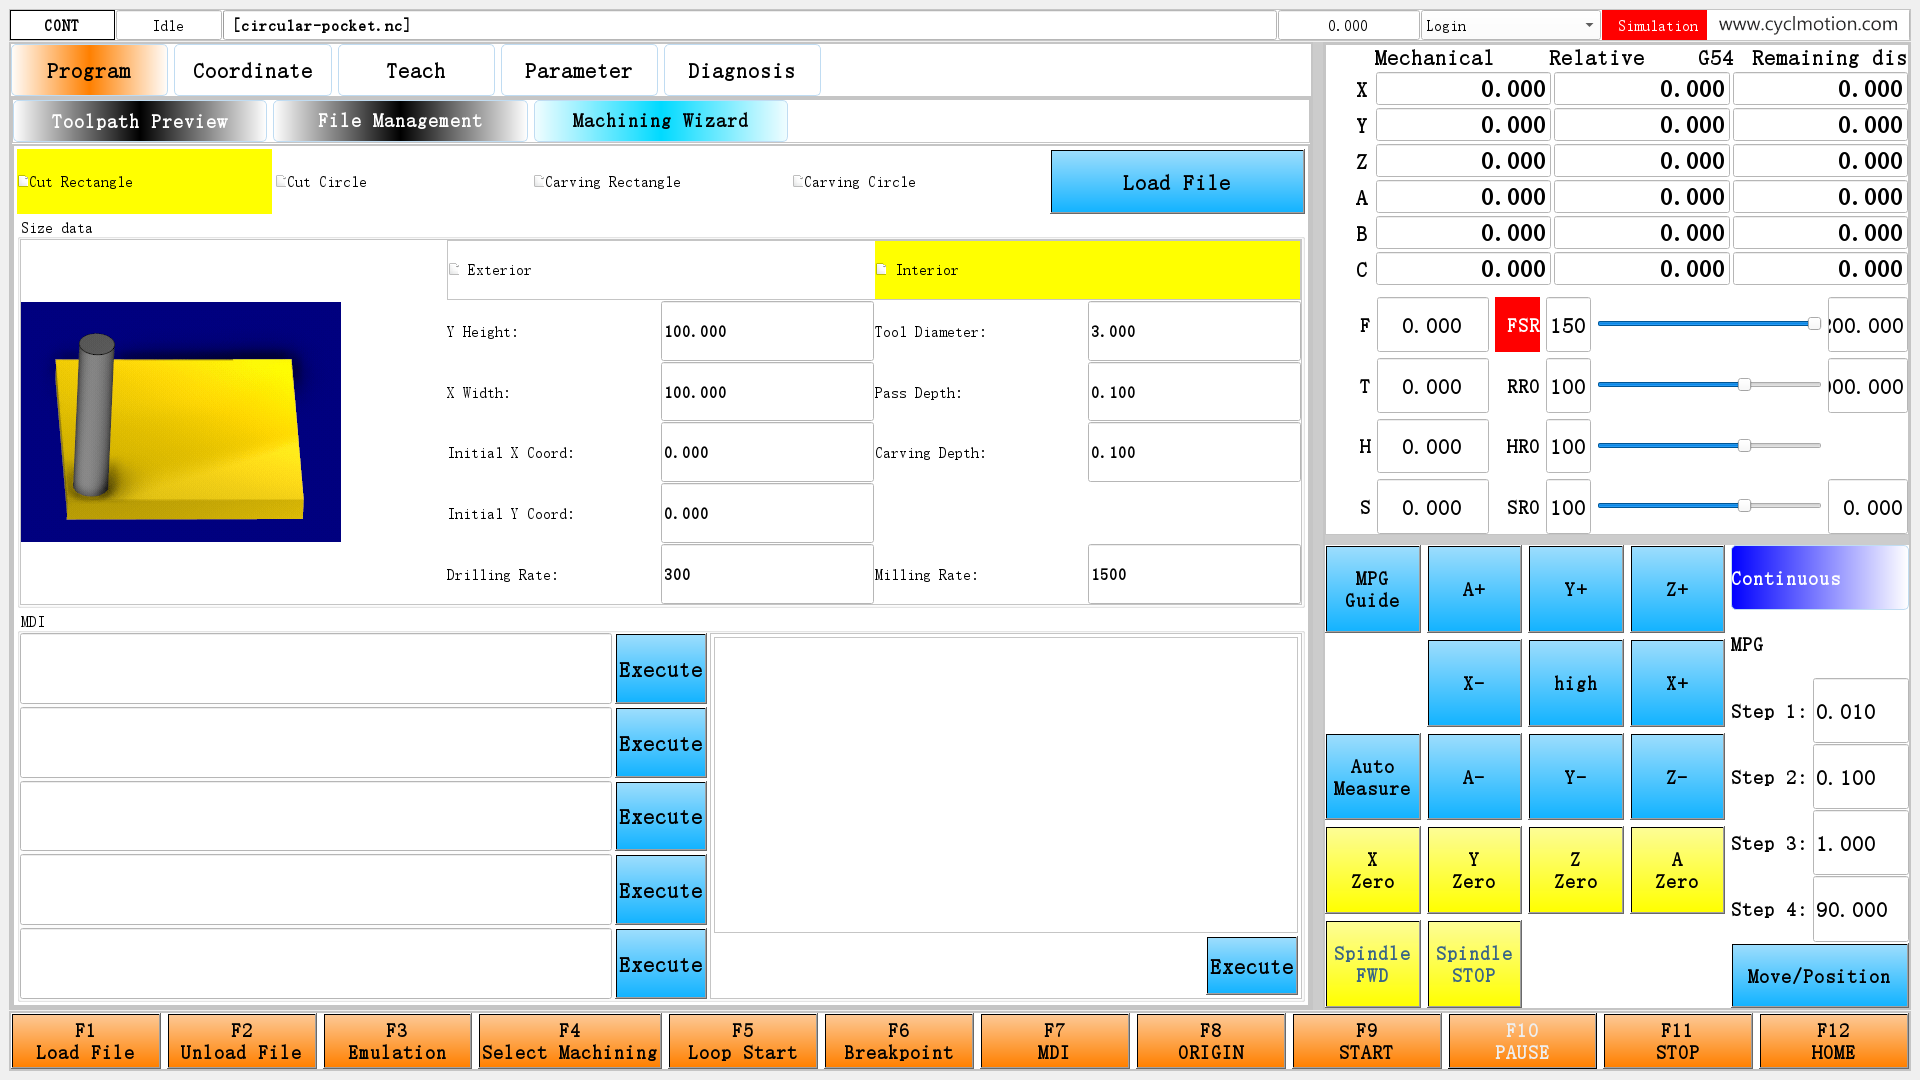
Now click Machining Wizard in the same row. The highlight moves to that tab, and the area below shows Cut Rectangle, Cut Circle, Carving Rectangle, and Carving Circle.
Click the screenshot to enlarge it. Full-resolution screenshots are included in the offline package.
Figure 3. The page after clicking Machining Wizard. This chapter explains how the page appears; do not operate its Load File or Execute buttons for this exercise. The displayed dimensions and other values come from the existing configuration. They are not machining settings to enter for this lesson.
When comparing these images, focus on two changes: which tab is highlighted and which content area is visible below it. The existing configuration uses the same value to decide both.
Coordinates and values in the screenshots are examples. Follow the configuration of your software and machine.
2. Use one value to remember which page is selected
In a macro program, you may use a variable to record the current step. This page uses a similar method:
#810records the selected child page.Value of #810Selected tab Content to show 0Toolpath Preview Toolpath preview area 1File Management File management page 2Machining Wizard Machining wizard page When you click File Management, the first change is:
#810=1When you click Machining Wizard, it is:
#810=2Both assignments are already in the existing tab settings. The operator does not type them. The standard configuration assigns the meanings
0,1, and2to these three pages.There is another form that is easy to confuse with this:
#810.permission. In this example, it records which main page is selected in the row above; for example,0means Program. The value#810records which child page is selected under Program. They are different fields of the same parameter. Here, the configuration uses thepermissionfield to select a main page; it does not represent the login role.3. Find the files, then the names used inside the page
Open
envin the software's working folder. This chapter mainly uses the following files:File What to look for env/dmec-app-black.uiThe outer main interface, which loads the standard main interface content env/maininterface/maininterface.uiThe Program entry, the three tabs, and the areas where their content appears env/file/filepageThe script run when File Management is clicked env/file/file.uiThe layout of the file management page env/program/advancedpageThe script run when Machining Wizard is clicked env/program/advanced.uiThe layout of the machining wizard page env/mainStartup preparation of the page selection value and first-entry flags A
.uifile describes the page's controls, layout, and settings. Files such asfilepageandadvancedpage, which have no extension, are configuration scripts that you can read in a text editor.If you open
maininterface.uiin Qt Designer, find the following names in its object list. TheobjectNameis the control's name inside the file, allowing a script to find that control precisely. The name shown on screen can be different.Position on screen Name in the file ( objectName)Program entry label_39Toolpath Preview tab label_44File Management tab label_45Machining Wizard tab label_46Toolpath preview content area frame_17File management content area fileFrameMachining wizard content area advancedFrameThese tabs use
QLabellabel controls in the UI file. The configuration gives them click actions, so they work like buttons. The three content areas useQFrame. Think of a frame here as a reserved area of the page into which content can be placed.Next, look mainly at the
accessibleDescriptionproperty. This is its actual name in the editor. The system uses it to store settings such as what to display, what to do when clicked, and when the control should be visible. If you read the XML file directly,<and>are XML escapes. The code blocks below use the text as shown in the property editor.4. Why clicking File Management runs that script
Find
label_45. Its completeaccessibleDescriptionis:-T(#1100itemtitle6) -A:(clickedEvent:/env/file/filepage[0](#810=1)) -C1(#810==1) -C0(1) -C(#929item5==1) -V2 -DStart with the second line. You do not need to memorize every setting at once:
-A:(clickedEvent:/env/file/filepage[0](#810=1))This one setting combines three things:
Part Meaning in this example clickedEventRun the action when this tab is clicked (#810=1)First record File Management as the selected child page /env/file/filepage[0]Then call env/file/filepage;[0]selects the script execution channelHere,
/env/...is resolved from the software's working folder.[0]does not mean page 0. This click selects File Management, which is#810=1. Reading the assignment and the path together takes you from the interface to the script you need to examine.The remaining lines control the text, highlight, and whether the entry is visible:
Existing setting What it does -T(#1100itemtitle6)Gets the tab text from #1100.itemtitle[6]. The English language pack supplies File Management-C1(#810==1)Uses appearance 1 when #810is1: the selected highlight shown in the images-C0(1)Uses normal appearance 0 when the preceding selected condition is not met -C(#929item5==1)and-V2Uses the third condition to decide whether the entry is visible; it appears when the file management feature switch is 1-DContinues checking and updating this control during operation, so its text and state follow parameter changes The
2in-V2is a condition index, counted from0. The three-C…lines above have indices0,1, and2, in order. This number is not a page number either. Read the condition and the visibility setting that refers to it together.The highlight colors themselves are not written in the script.
frame_16, the area containing all three tabs, already defines appearances 0 and 1. Each tab only needs to state when to use each appearance.5. Why the content changes when a tab is highlighted
In the same
maininterface.ui, findfileFrame. Its settings are:-T(811) -C(#810==1) -V0 -DLook first at the last three lines. There is only one condition here, so its index is
0:-C(#810==1) -V0 -DThese lines mean: check
#810==1; show this area when the condition is true, hide it when false, and keep updating during operation.The other two content areas check
#810==0and#810==2. Changing#810during normal page switching therefore shows one area and hides the other two.Value after the click Why the tab is highlighted Why the content appears #810=0Toolpath Preview meets -C1(#810==0)The visibility condition of frame_17is true#810=1File Management meets -C1(#810==1)The visibility condition of fileFrameis true#810=2Machining Wizard meets -C1(#810==2)The visibility condition of advancedFrameis trueThe tab and its content area have separate settings, but both check the same page selection value. This keeps them in agreement. It describes the result after updating; it does not promise that every drawing operation happens at exactly the same instant.
Ordinary showing and hiding when switching pages does not reload the UI file. How, then, is the File Management page placed into
fileFramethe first time? Continue with the script called by the click.6. Understand the seven lines of filepage
The complete effective content of
env/file/filepageis:widgetFunc["disk","","",803] IF#811.version==1GOTO1 #811.version=1 widgetFunc["dir",#802,"",802] #811.itemdesc[0]="/env/file/file.ui" widgetFunc["QFrame","fileFrame","refresh",""] N1If you know
IF/GOTO, start with the condition on line 2: if this page has already been prepared, jump directly toN1; otherwise, prepare it once.The first time you click the tab
Startup has set
#811.versionto0. The first entry therefore continues through the following lines instead of jumping toN1.Order Code Purpose in this example 1 widgetFunc["disk","","",803]Places available drive information in #803for the drive list on the left2 IF#811.version==1GOTO1Checks whether the initial preparation has already been performed 3 #811.version=1Sets an already-prepared flag 4 widgetFunc["dir",#802,"",802]Reads the folder specified by #802and fills the file-list data in#8025 #811.itemdesc[0]="/env/file/file.ui"Records which UI file this area should load 6 widgetFunc["QFrame","fileFrame","refresh",""]Finds the area named fileFrameand reloads its content according to its settings7 N1Provides the jump label; the file ends after this widgetFunc[...]is how a configuration script calls existing interface functions. This example uses only three: list drives, list a folder, and load page content. You do not need to learn all of its commands first.How the filename reaches the page
Read these three parts together:
fileFrame setting: -T(811) Script stores the path: #811.itemdesc[0]="/env/file/file.ui" Script requests loading: widgetFunc["QFrame","fileFrame","refresh",""]-T(811)tells this area to find its content description in parameter 811. That parameter's.itemdesc[0]supplies the UI path.refreshthen asks the software to load the page according to that description. The standard configuration has already prepared the required items in#811.The last argument to
refresh,"", is an empty string. The file path is stored in.itemdesc[0]on the preceding line. Do not assume that the fourth argument is a UI filename simply because the call has four arguments.Also distinguish the tab's
-T(#1100itemtitle6)from the area's-T(811). The former supplies text for a label; the latter identifies the content description parameter for aQFrame. Read the setting together with the type of control that uses it.Leave the page, then come back
Now
#811.versionis1. The script still updates the drive list first. At line 2 it jumps directly toN1, skipping the initial folder read, the UI path assignment, andrefresh.This explains the flag's purpose: switching a page makes existing content visible; first-entry preparation puts that content there. Loading it again on every switch would rebuild the page controls. The existing configuration avoids doing that.
Here,
.versionis a field used by the standard configuration to store a flag. It is not the software version number. The script sets it to1before loading the UI, so the value does not prove that loading succeeded. If a file is missing or its name is wrong, check the path and the file rather than relying on the flag alone.7. What the other two pages share, and how they differ
Machining Wizard loads another UI in the same way
The click setting for Machining Wizard is:
-A:(clickedEvent:/env/program/advancedpage[0](#810=2))It selects page
2, then runsadvancedpage. The first four lines of that script are:IF#812.version==1GOTO1 #812.version=1 #812.itemdesc[0]="/env/program/advanced.ui" widgetFunc["QFrame","advancedFrame","refresh",""]This is an excerpt from the start of the original file. Further wizard preparation and
N1follow it. Do not use these four lines as a complete replacement file.Compare the two pages to see the shared method:
Decision File Management Machining Wizard Which page to select #810=1#810=2Which area holds it fileFrameadvancedFrameWhich parameter describes the UI -T(811)-T(812)Where to store the UI filename #811.itemdesc[0]#812.itemdesc[0]Which field records prior preparation #811.version#812.versionInside the wizard, the value of
#812also selects the wizard category. Do not confuse that with selection among the three pages discussed here. These three pages are always selected by#810.Toolpath Preview is already in the main UI
The click setting for Toolpath Preview is:
-A:(clickedEvent:/env/null[1](#810=0))env/nullis an existing empty script. This setting mainly uses the assignment attached to the click to return#810to0. The preview content is already inframe_17insidemaininterface.ui. Unlike the other two pages, it does not need a separate UI file to be read on first entry.Again,
[1]selects the script execution channel. It does not select page1.8. Why startup returns to Toolpath Preview
The following existing assignments can be found in
env/main. They are grouped here by purpose:#810.permission=0 #810=0 #811.version=0 #811.itemdesc[0]="" #812.version=0 #812.itemdesc[0]=""The first two lines select Program → Toolpath Preview. The remaining lines clear the first-entry flags and UI paths for the file and wizard pages.
The main interface therefore starts with the preview. When File Management or Machining Wizard is first opened, its own script supplies the path and loads its content. Hiding an area alone does not prevent the software from reading a UI path that is already set when the main interface is created. This is why startup clears the paths as well.
Switching from Program to another main page and then back is different. The
env/programpagescript called by the Program entry does not reset#810. Provided no other script changes the selection, the previously selected child page can remain selected. Language changes and parameter load or restore operations have their own reset handling. Preserving the selection across a page switch does not make it permanent storage.9. Follow one click through the whole design
You can now explain a click on File Management in this order:
- In
maininterface.ui,label_45is the File Management entry. - Its click setting first executes
#810=1, then runsenv/file/filepage. - Because
#810==1, the tab uses the highlighted appearance,fileFrameis shown, and the other two content areas are hidden. - If
#811.versionis not yet1, the script writes the UI path and asksfileFrameto loadfile.ui. - On a later entry, it keeps the page already created and skips the initial preparation.
The existing design answers five questions: which value selects the page; how a click changes it; which area is shown; which file supplies the content; and when preparation is needed. Together, these explain the complete three-page design.
Check it in a software copy
Only switch tabs for this check. You do not need to run a machining program or change any files.
Action What to observe Open Program and click File Management File Management is highlighted; drive and file lists appear Click Machining Wizard Machining Wizard is highlighted; wizard categories, size inputs, and the MDI area appear Click Toolpath Preview Both the highlight and content return to the preview Click File Management again The file page returns; use the IF/GOTOcondition to understand why initial preparation is skipped this timeYou cannot determine from appearance alone whether the page was rebuilt. First use these operations to check the visible result, then read the script condition to understand the difference between the first and subsequent entries.
Where to look if the display is wrong
Symptom or misunderstanding What to check File Management is missing Check the #929.item[5]condition onlabel_45; this existing feature switch controls the entryThe tab is highlighted but the wrong content appears Check that the tab and content area both test the same value of #810The file page is empty Check fileFrame's-T(811),#811.itemdesc[0], whether the UI file exists, and whether the name inrefreshisfileFrameAssuming .version=1means loading succeededThe script sets this field in advance; check the file and the actual page too Treating [0]or-V2as page numbersThis example stores the page number in #810; the other numbers select a script channel and a conditionAssuming every page switch needs refreshNormal switching uses visibility conditions; the original design runs refreshwhen it needs to create the contentYou can now trace these familiar clicks to the parameters, page settings, and scripts that make them work.
在线咨询 - Download
