
- Home
- About
- Products
Motion controller
CM600 RTCP 6-Axis Motion controll
CM300 R 3-Axis Motion controller
CM300 3-Axis Motion controller
- Download
- Support
- Applications
CNC Development Manual
How the Teach page turns parameters into a program
Download the bilingual offline manual (ZIP, 8.7 MB; original-resolution screenshots included)
The earlier lessons covered file selection, program execution and status display. This group follows another route through the existing Teach page: choose an instruction, enter its parameters, record the resulting code, and create a file for the Program page to display and use.
We will use the existing Delay instruction. Its three parameters make the whole process easy to follow. By the end, you should be able to find a Teach instruction's parameter page, its code generation script, and the script that restores its parameters for editing. This lesson adds no new instruction.
中文版 ·
1. Find the instruction on the original Teach page
Select Teach at the top, then Delay on the right. The left side lists recorded program lines. The right side holds the current instruction's parameters, with Generate code line below them. Save, Open, and Load Code at the lower left have different purposes, explained later.
This walkthrough starts with an empty Teach program. When practising in your own software copy, use Save first if the list contains work you need to keep. Then choose New and confirm that you want to clear it.
Enter these values. Press Enter after typing the time to commit the input.
Position on the page Selection or input used here Delay Policy Single line delay Delay Time (sec) 1.25, displayed as1.250after committingData Source on the same row Value Sel checkbox beside Program line number Leave it unchecked; the 1on that row will therefore not be added to the code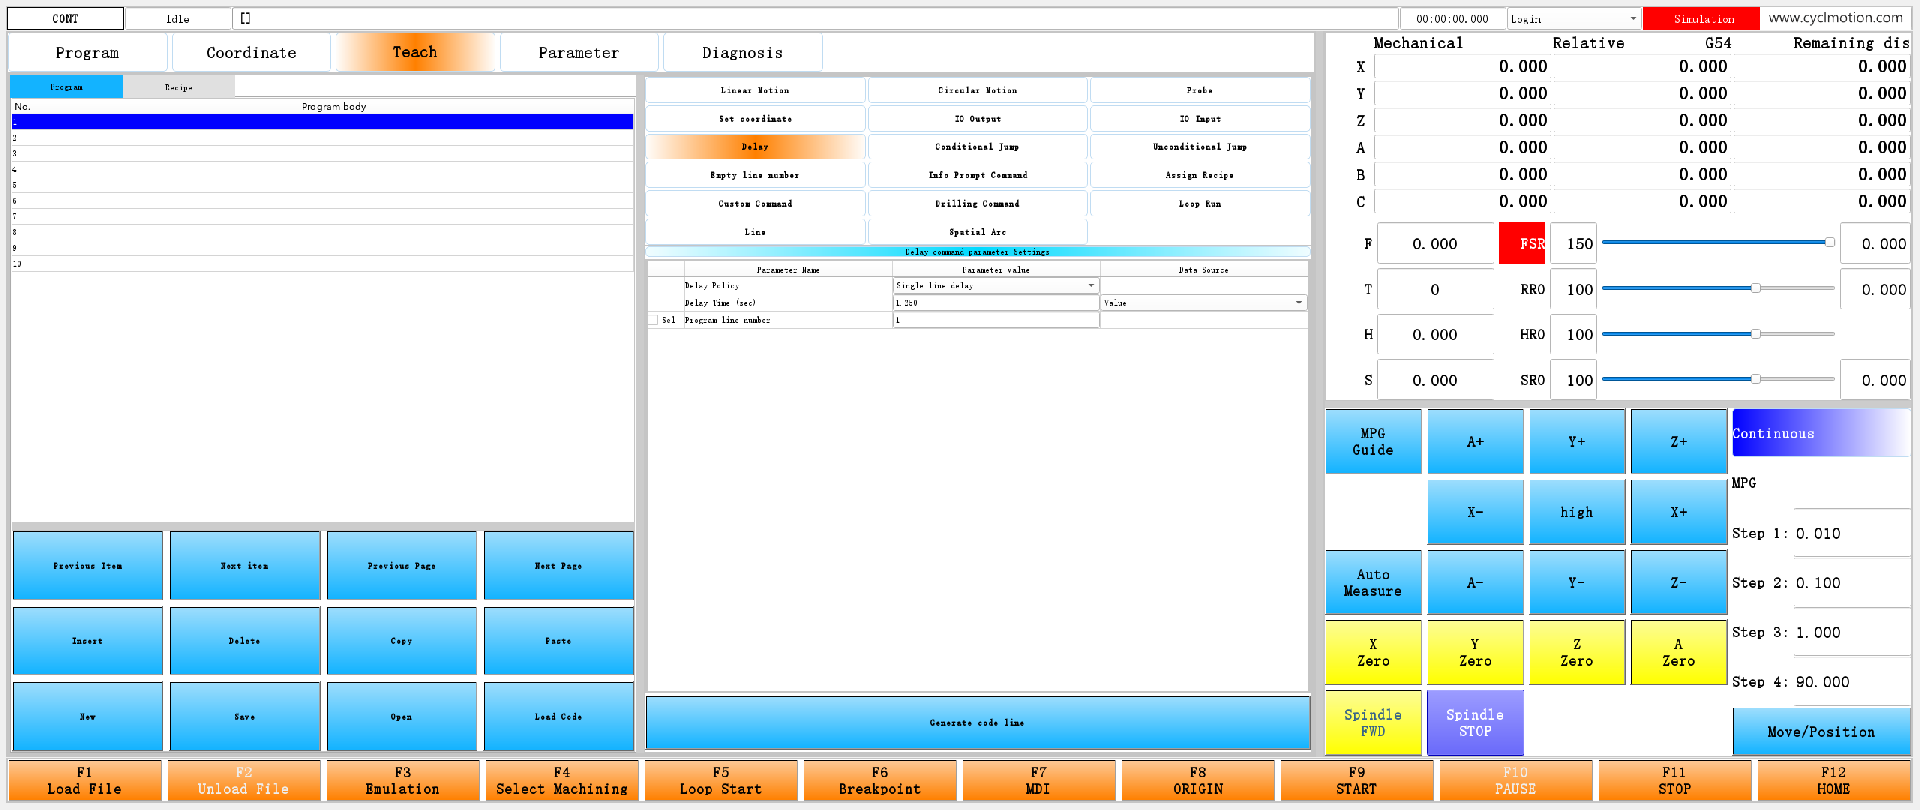
Click the screenshot to enlarge it. Full-resolution screenshots are included in the offline package.
Use the overview to locate controls and the close-ups to read their text and values. In the illustrated HTML edition, click an image to enlarge it, use + / − to adjust its size, and press Esc or Close to return to the text.

Click the screenshot to enlarge it. Full-resolution screenshots are included in the offline package.
The indicator at the top right of Figure 1a reads Simulation. This lesson covers parameter editing and code generation; it does not require Move/Position or other machine-motion controls.
2. Entering parameters is followed by Generate code line
Press Generate code line at the lower right:

Click the screenshot to enlarge it. Full-resolution screenshots are included in the offline package.
Row 1 on the left now contains:
G04P1250
Click the screenshot to enlarge it. Full-resolution screenshots are included in the offline package.
This operation records the instruction type, saves the parameters used to build it, writes the code text, and advances to the next position. Although the blue highlight is now on row 2, the program still contains only one recorded line. The table displays ten positions in advance; empty positions do not mean ten program lines already exist.
The
1.250still visible on the right is not a permanent connection to row 1. The right side holds the parameters currently being prepared. The left side holds the result saved when the button was pressed. Changing an input alone does not change a recorded line.3. Follow the operation, then locate its files
Read the existing design in this order:
Enter Teach → select Delay → enter parameters → generate a code line → select that line again and edit it → Load Code → see
program.ncon the Program page.The following paths are relative to the application's run directory. For example,
env/teach/pausemeans that file under the run directory.Purpose Existing file What to notice Teach entry at the top env/maininterface/maininterface.uiChanges the main page and calls the entry script Load the Teach page into the main interface env/teachpageThis is the actual entry, not env/teach/teachpageProgram list, instruction buttons, Save and Load Code env/teach/teach.uiAll belong to the same Teach page Prepare the selected instruction's parameter page env/teach/codeselectBuilds the UI filename from the current instruction index Delay parameter table env/teach/ui/teach_7.uiReads names, values, and choices from parameters Choose the generator after Generate code line env/teach/addcodeThe Delay branch goes to N7, then callspauseSave the line's inputs and construct its Delay code env/teach/pauseConverts the entered seconds into code text Select an existing line again env/teach/refreshnode1,parsenodeRestores that line's original inputs on the right Save and open a Teach file env/teach/savefile,openfileUses .programfilesLoad Code env/teach/codeGenerateWrites an .ncfile and returns to the Program pageUse the actual button binding when following a feature. The button is labelled Load Code, while its script is named
codeGenerate. Likewise,pausehere generates a Delay instruction; it is not the machining PAUSE button.4. How selecting an instruction finds its parameter page
The top-level Teach entry has this click action:
-A:(clickedEvent:/env/teachpage[0](#810permission=4))#810.permission=4makes the main interface display the Teach area. This entry and its area also depend on#929.item[8]; check that condition if Teach is absent from your standard configuration.The first seven lines of
env/teachpageupdate#9995.itemdesc[0]through[6]from the current function-key assignments. Its remaining section loads the page on first entry:IF#837.version==1GOTO1 #837.version=1 #837.itemdesc[0]="/env/teach/teach.ui" widgetFunc["QFrame","teachFrame","refresh",""] widgetFunc["setWidgetAttribute","codeParamTable","",#1500.description] N1#837.versionrecords whether the outer Teach page has been prepared. Later entries skip this preparation. The penultimate line is an existing table-attribute assignment retained in the script. The table used in this example is the subsequently loadedcodeParamTable7; keep those two table names distinct.The Delay button has this click action:
-A: (clickedEvent:/env/teach/codeselect[0](#1500=6))It sets
#1500to6, then runs the completecodeselectscript below:#1500.channel=0 IF#[1800+#1500].version!=0GOTO3 #[1800+#1500].version=1 #[1800+#1500].itemdesc[0]="/env/teach/ui/teach_"+INT[#1500+1]+".ui" widgetFunc["QFrame","teachFrame"+INT[#1500+1],"refresh",""] N3Substituting
#1500=6makes the relationship clear:Original expression Object used for Delay #[1800+#1500]#1806, which stores the page's preparation state and filename"teach_"+INT[#1500+1]+".ui"teach_7.ui"teachFrame"+INT[#1500+1]The existing teachFrame7areaThe outer page is prepared once, and each instruction's parameter page is prepared separately when needed. Startup preparation in
env/mainresets the relevant states; selecting an instruction does not redefine all its parameters every time. Here6is the instruction index counted from zero, while7in the filename is that index plus one.5. How the table finds the right parameters
#1500selects the instruction.#1500.item[...]stores the parameter number used by each instruction. In this example:#1500 = 6 #1500.item[6] = 1513These are observed configuration values, not a definition script for you to run again. Following them leads to the Delay working parameters in
#1513and the companion settings in#1514.Parameter Meaning on the page Value in Figure 1 #1513.item[0]Delay Policy 0, Single line delay#1513.item[1]Delay Time, in seconds 1.25#1513.itemversion[1]Data source for this row 0, Value#1513.item[2]Optional program line number 1#1514.item[2]Whether to generate the line number Unchecked The table in
teach_7.uiis namedcodeParamTable7. It accesses the working parameter through#[#1500.item[#1500]]..itemtitlesupplies parameter names,.itemsupplies values, and the associated fields determine whether a row uses an input box, a list, or a checkbox. This lets similar table definitions serve different instructions.The fourth column's Value / Recipe Parameter Index choices come from language text in
#1104.itemtitle[25]and[26]. The selected source is stored in the working parameter row's.itemversion. After it changes,refresh7prepares the table again:widgetFunc["QTableWidget","codeParamTable7","refresh",""]Selecting the source and entering its value therefore work together. In Figure 1,
1.25is a directly entered duration in seconds. With Recipe Parameter Index, the same position selects a recipe parameter instead; it no longer means a duration entered directly.One detail matters when customising the table: the original configuration tests the literal field-description marker
可配置源to decide whether to offer a data-source choice. This marker participates in a condition; do not rename it as ordinary display text. Operator-facing names are obtained separately from parameter titles and the language pack.6. How Generate code line constructs G04P1250
The original event on Generate code line is:
-A: (MouseButtonRelease:/env/teach/addcode[1])At the start,
addcodemakes sure the current position has a record to write, then obtains the two parameter numbers for the selected instruction:IF#1551==-1THEN#1551.itemnum=1 IF#1551==-1THEN#1551=0 IF#1551>=#1551.itemnumTHEN#1551.itemnum=#1551+1 #11=#1500.item[#1500] #12=#1500.item[#1500]+1Here that gives
#11=1513and#12=1514. The later expression^11.item[1]means: take the parameter number stored in#11, then access item 1 of that parameter. In this example it accesses#1513.item[1].When
#1500==6,addcodejumps toN7and calls/env/teach/pause. This is the complete generator:#1551.itemversion[#1551]=7 #1551.itemtitle[#1551]="A"+^11.item[0] #1551.itemtitle[#1551]=#1551.itemtitle[#1551]+"B"+^11.itemversion[1] #1551.itemtitle[#1551]=#1551.itemtitle[#1551]+"C"+^11.item[1] #1551.itemtitle[#1551]=#1551.itemtitle[#1551]+"D"+^12.item[2] #1551.itemtitle[#1551]=#1551.itemtitle[#1551]+"E"+^11.item[2] #1558.item[0]="" #1558.item[2]="" IF^12.item[2]==1THEN#1558.item[0]="N"+^11.item[2] IF^11.item[0]==1GOTO1 IF^11.itemversion[1]==1THEN#1558.item[2]="P"+"INT[#1550.item["+INT[^11.item[1]]+"]*1000]" IF^11.itemversion[1]==0THEN#1558.item[2]="P"+INT[^11.item[1]*1000] N1 IF^11.item[0]==0THEN#1558.item[1]="G04" IF^11.item[0]==1THEN#1558.item[1]="#1513=#9990.channel" IF^11.item[0]==2THEN#1558.item[1]="G104" #1551.item[#1551]=#1558.item[0]+#1558.item[1]+#1558.item[2] #1551.itemdesc[#1551]=#1551.item[#1551] #1551=#1551+1 #1551.channel=FIX[#1551/10] widgetFunc["SysFunc","0","parser","/env/teach/parsenode"]Follow the branch selected in this walkthrough first:
- The first six lines store the instruction type and its inputs in the current record for later editing.
- The line-number checkbox is unchecked, so
#1558.item[0]remains empty text. - The data source is Value.
"P"+INT[1.25*1000]producesP1250. - Policy
0selectsG04. - The three text pieces are joined as
G04P1250and written to the code field and display field. - The current position advances by one. The page number is updated for ten positions per page, and the script attempts to restore parameters at the new position.
In these statements,
+joins text.INT[...]puts the result into the text in integer form. Multiplying seconds by1000is the rule in this actual script, not an assumption borrowed from another CNC system.Two other policies remain in the script:
1generates timestamp-assignment text, while2generatesG104. With Recipe Parameter Index, the script stores expression text containing#1550.item[...]instead of substituting the recipe's current value immediately. Their execution rules require further checks against the machining interpreter. The UI walkthrough here verifies only Single line delay + Value.7. How selecting the line restores its inputs
If the Teach list stored only
G04P1250, later editing would have to reconstruct inputs from that code. The existing design saves editing information alongside the code:Location in #1551Use in this configuration Record 0 after the first generation Main value of #1551Current record position, counted from 0Already advanced to 1.itemnumNumber of recorded entries 1.itemversion[0]Instruction type 7, Delay.itemtitle[0]Parameter text used for editing A0B0C1.250DfalseE1.item[0]Actual code text G04P1250.itemdesc[0]Text shown in the program list G04P1250Amarks the policy,Bthe data source,Cthe duration or recipe index,Dwhether to add a line number, andEthe line number. The unchecked value is actually written asfalsein this capture; do not assume every saved value is an integer0. Here.itemtitleholds editing information, not an operator-facing row title.Starting from Figure 2, temporarily change the time on the right to
9and commit it, without pressing Generate code line. Then click the program body in row 1 on the left. The time returns to1.250, restored from the information already saved with that row.The original table passes the record position to
refreshnode1:-A: (clickedEvent:/env/teach/refreshnode1[0](#1551=%%+#1551channel*10))%%is the visible row index, counted from0. Adding the page number multiplied by10gives the position in the complete list. The first row on the first page is record0. When a record needs to be restored,refreshnode1callsparsenode. Its Delay branch is:N7 #11=#1500.item[6] #12=#1500.item[6]+1 ^11.item[0]=#1551.itemtitle[#1551]/"A"*"B" ^11.itemversion[1]=#1551.itemtitle[#1551]/"B"*"C" ^11.item[1]=#1551.itemtitle[#1551]/"C"*"D" ^12.item[2]=#1551.itemtitle[#1551]/"D"*"E" ^11.item[2]=#1551.itemtitle[#1551]/"E" #1500=6 widgetFunc["SysFunc","3","parser","/env/teach/codeselect"] GOTO100For example, applying
/"C"*"D"to the saved text extracts the part betweenCandD:1.250here. With text operands,/and*perform this system's text extraction operations; read them according to their operands rather than as ordinary numeric division and multiplication.Now change the restored time to
2.5and commit it. The right side displays2.500, but the left still holdsG04P1250:
Click the screenshot to enlarge it. Full-resolution screenshots are included in the offline package.
At the same moment, the selected program row still contains its previous code:

Click the screenshot to enlarge it. Full-resolution screenshots are included in the offline package.
Press Generate code line again. Row 1 becomes
G04P2500. There is still only one recorded entry, and the highlight advances to row 2:
Click the screenshot to enlarge it. Full-resolution screenshots are included in the offline package.
Generate code line writes at the current position. It replaces an existing selected record, or adds a record at an empty position at the end. To make room in the middle, use Insert, then enter the parameters and generate the line.
8. Saving a Teach file and loading NC code serve different purposes
Distinguish these three controls at the lower left:
Button What it saves or reads When to use it Save Saves #1551, including its records and associated information, to.programKeep a Teach program that can be edited later Open Reads .programinto#1551, then attempts to restore the current instruction's inputsContinue editing previously saved work Load Code Writes each recorded code entry to env/teach/doc/program.nc, then loads it on the Program pageView or hand over the generated NC result Save first opens a
*.programfilename dialog. After obtaining the path, its script executes:widgetFunc["SysFunc",#1551.description,"saveParamItemAs1",1551]After Open obtains its path, it executes:
widgetFunc["SysFunc",#1551.description,"readParamItemFrom1",1551]The
.programfile preserves instruction types and editing parameters as well as code. It is not a plain-text NC file. The separate Recipe page uses#1550; its load and save operations use a separate.formulafile. Saving a Teach program does not bundle that recipe into it.9. How Load Code connects to the Program page
With the single
G04P2500entry recorded, press Load Code at the lower left. It runscodeGenerate:
Click the screenshot to enlarge it. Full-resolution screenshots are included in the offline package.
Its first line is:
widgetFunc["systemParamToFile",1551,0,"/env/teach/doc/program.nc"]1551is the parameter to export.0selects each record's.itemtext; empty text records are skipped. The destination isenv/teach/doc/program.ncunder the run directory, using the same path on each write. This step does not rerun the individual instruction generators. Regenerate any edited line before loading the code.The script then connects the file to the machining file list and program text display:
#334.itemnum=0
#334.item[1]=#405+"teach/doc/program.nc"
#9047=#334.item[1]
#9048.channel=0
#9048.permission=widgetFunc["getFileLineNum","","",#9047]
#403=#9047
#333.item[1]=0
#333.item[13]=1
In the standard environment,
#405points toenv/under the run directory, including the trailing/. The loaded path must match the written file. If you change the environment or output location, check both the export and load paths.After recording the load information, the script executes:
#810.permission=0
#810=0
This returns to Toolpath Preview under Program. As explained in File Management,
#334holds the machining file list,#403identifies the current machining file,#9047supplies the program text display, and#9048holds its position and line count. The original script also requests clearing of the old drawing. Loading text and interpreting a new toolpath remain separate operations.
Click the screenshot to enlarge it. Full-resolution screenshots are included in the offline package.
The generated file here contains only
G04P2500and its line ending. The empty second line in the text display comes from the final newline. The exporter adds no program header, end command, or other machining operations. This single-line result explains the configuration process; it is not a complete machining program. Verification stopped at file creation and text display, without starting NC execution.10. Read the other editing buttons by what they actually change
Once you understand how one record is written and restored, the remaining buttons are easier to follow:
Existing operation What it does Point to retain when customising Previous Item / Next item Changes the current position in #1551and restores that record's inputsThe position also determines where the next generated line is written Previous Page / Next Page Changes page and position in groups of ten Changing the visible row count alone does not change the scripts' 10Insert Inserts a record at a valid current position At an empty end position the script exits; generating there already appends a record Delete Removes the current record after confirmation, then restores inputs at that position It does more than clear visible text Copy Stores the current record index in #1551.versionIt does not make an independent copy of the row yet; inserting or deleting rows can change what that index refers to Paste Copies code, saved inputs, display text, and type from that recorded index Writes at the current position, expanding the count if necessary; it does not always insert a row New Clears record count, current position, and page after confirmation Do not infer that it also clears recipes or disk files Clicking the same row again may take
refreshnode1into its#9519menu branch. That branch depends on conditions including the previous position and matching type; not every click restores inputs. Menu contents also depend on the corresponding parameter configuration. This example selects row 1 after the position has advanced, so it follows the normal restore branch.Capturing a position, recording a point, Move/Position, and running an instruction also need to be distinguished by their actual actions. Some entries read coordinates, some record code, and some enter NC execution. For motion instructions, follow the relevant events into scripts such as
localpos,custom/recordLinePoint,custom/local, andcustom/run. None of those actions was used in this lesson.11. What must stay aligned when customising Teach
The existing example gives a clear working sequence: let an operator enter parameters, store them in an editable record, and then output the code. When adjusting a related feature, use this table to find the appropriate configuration files before turning to C++.
Change wanted Start here Also check Instruction names and parameter labels #1500.itemtitle[...], working parameter titles, language packsActual Chinese and English wording; fixed condition markers must not be translated as titles Parameter-page contents The corresponding teach_*.uiand working parameter definition#1500.item[...]still selects the right parameter group, with the correct companion settingsGenerated code format The addcodebranch and actual generatorChanging display text alone does not change export; export reads .itemHow an input is saved and restored .itemtitleassignments in the generator and the matchingparsenodebranchLetter delimiters and field order must match; compatibility with older .programfiles needs separate verificationA new Teach instruction Instruction entry, parameter mapping, UI, generation branch, restore branch Adding a button alone is insufficient; verify each instruction/type mapping instead of assuming every type is its index plus one Output file location Export and load statements in codeGenerate#405,#334,#403, and#9047must lead to the same resultUse these checks for common problems:
Symptom First check The input time changed, but the recorded line did not Was the input committed and Generate code line pressed afterwards? An existing line changed when you meant to append Was #1551still selecting an existing record?A new line appeared when you meant to edit Did you select the original line first? Generation advances the current position Code looks correct, but selecting it restores wrong inputs Does the .itemtitlefield order matchparsenode?Changing the data source does not change the editor Did the event reach refresh7, and is the field-description marker intact?A line number was entered, but no Nwas generatedIs its Sel checkbox checked? Load Code still produces the old time Was only the input changed, leaving the recorded code unchanged? The recipe differs after moving a .programfile to another PCWas the required .formulafile saved and loaded separately?Editing a UI file has no effect after switching away and back Has that page already been prepared? The entry script reuses loaded pages The next lesson examines Teach tables: paging, recipe editing, row filtering, input choices, refresh and position buttons inside cells. Continue with Line and Spatial Arc point capture, recipe references, and saving Teach files.
Previous: Progress, prompts and alarms · Next: Teach tables · Reading guide
Online - Download
