
- 首页
- About
- Products
- Download
- Support
- Applications
CNC Development Manual
How the panel's function keys are configured
Download the bilingual offline manual (ZIP, 8.7 MB; original-resolution screenshots included)
The previous chapter explained that the inner-hole probing function already exists even when it has no button on the current panel. Defining a function and assigning it to a button position are separate steps.
This chapter follows a simpler existing function: moving Deployment on the Parameter page from F5 to the empty F3 position. It uses the existing buttons, menus, and scripts. It adds no function and does not run deployment.
1. Find the area used in this example
Click the screenshot to enlarge it. Full-resolution screenshots are included in the offline package.
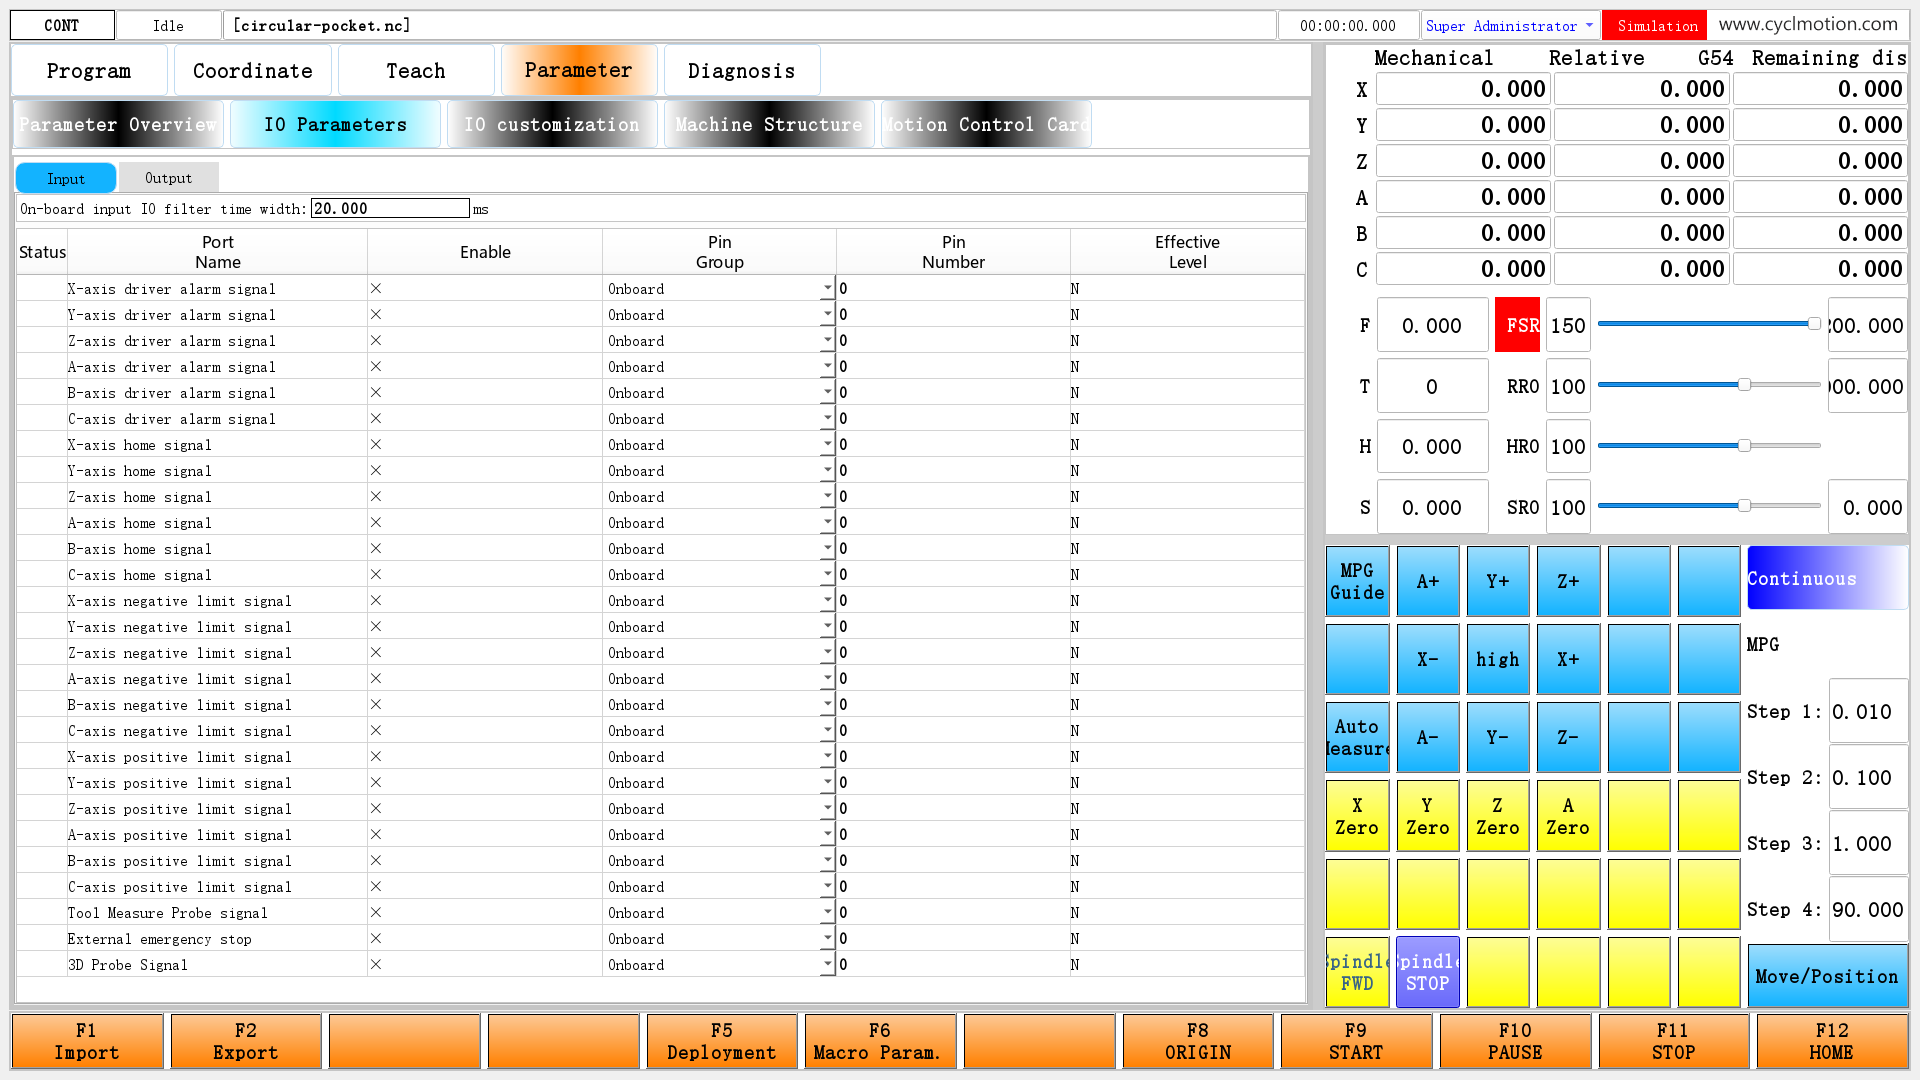
Figure 1. The standard Parameter page. IO Parameters is the selected subpage; this lesson concerns only the orange function keys at the bottom. The IO settings are not changed.
There are 12 positions from left to right. In the configuration reviewed here:
Position Before After this example Third, corresponding to F3 Blank F3 / Deployment Fifth, corresponding to F5 F5 / Deployment Blank The empty position does not even display its F3 label, but the button position still exists. Super Administrator, at the top right, is the interface's name for the developer identity used here. Administrator is a different identity with different permissions.
The screenshots show the standard interface. Coordinates, filenames, and parameter values are examples; use the values appropriate to your configuration.
2. Follow the user's operations first
In a practice copy, log in using that environment's existing developer account so the top-right identity reads Super Administrator, then open Parameter. Customers may already have rearranged their buttons; find the existing Deployment button first.
Step 1: Right-click the original F5 Deployment button and select Empty.
Click the screenshot to enlarge it. Full-resolution screenshots are included in the offline package.
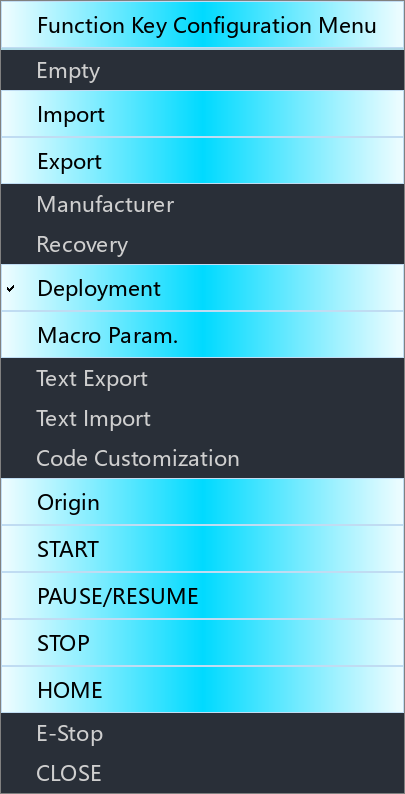
Figure 2. The check mark in Function Key Configuration Menu indicates that this position currently uses Deployment. That function is already assigned and cannot be selected again. Empty is available.
Selecting Empty blanks the original F5 position. It removes the assignment at this position; the deployment script and installed components remain in place.
Step 2: Right-click the third blank position and select Deployment.
Click the screenshot to enlarge it. Full-resolution screenshots are included in the offline package.
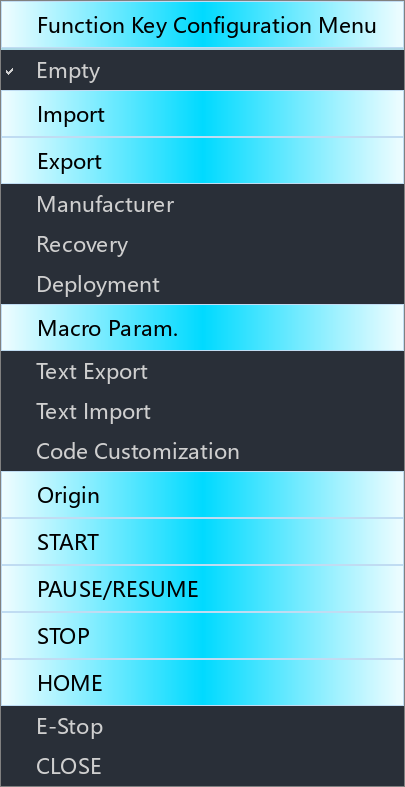
Figure 3. The third position is still empty, so Empty has the check mark. Deployment is now available because its original position has been cleared. Background colors follow the original menu stylesheet; brightness alone does not indicate whether an item is selectable.
Step 3: Check the updated button.

Click the screenshot to enlarge it. Full-resolution screenshots are included in the offline package.
Figure 4. A direct capture of the native function-key strip: F3 / Deployment appears, the original F5 position is blank, and the other assignments remain as before.
Stop here to inspect the result. Left-clicking the new button or pressing F3 would enter the deployment function; neither action is needed for this lesson.
If you right-click F3 before clearing F5, Deployment is unavailable because F5 still uses it. The standard menu requires clearing the original position before selecting the new one. It does not automatically swap buttons. To restore the layout, clear F3 and select Deployment at the fifth position.
3. Locate the files and parameters
Paths below are relative to the software's runtime directory.
File Its role here env/mainPrepares initial page values and first-load flags, then requests the main window env/maininterface/maininterface.uiMain interface, Parameter entry, and bottom function-key area env/mainInitAfter the main interface exists, applies existing assignments to Program function keys and right-hand controls, and prepares Program shortcuts env/parampageEnters the page, loads the function-key UI, applies assignments, and updates page shortcuts env/param/paramfunc.uiShapes, arrangement, and object names of the 12 buttons env/param/paramfuncmenuChecks permission and opens the configuration menu env/param/selmenufuncChanges an assignment and immediately updates its button after a menu selection env/funcscripts/deployComponentsRuns when Deployment is subsequently used; not executed in this lesson env/i18n/translatPack-0,translatPack-1Chinese and English menu and interface wording Most of the button configuration is held in the parameters already loaded by the application:
Parameter What it holds in this example #915and its itemsMenu names, conditions, and selection scripts; the main value temporarily holds the selected function number #916and its itemsAssignments, button object names, function attributes, and position attributes; the main value temporarily holds the position being configured #9995and its itemsKey names and the action attributes used by the current page #1026.item[0]Current identity; the configuration entry requires 2You do not need to edit
setting-envor binary backups by hand. First make a selection in the existing interface, then examine these fields to understand how that selection is recorded.4. Distinguish the third button from function 5
Script position numbers start at
0, so the third button is position2. Deployment is function5. After the move, the important fields are:Field Value after the move Meaning #916.item[2]5The third position uses function 5 #916.itemtitle[2]paramFuncButton3UI object for the third position #916.itemdesc[5]Deployment action attributes What function 5 does #916.itemunit[2]Display and right-click attributes for the third position How this position displays and remains configurable #915.itemtitle[7]Deployment The corresponding name in the menu This menu begins with a heading and separator; function 0, Empty, starts at item 2. Consequently, this menu finds a function's name at “function number plus 2”: function 5 uses
#915.itemtitle[7]. This numbering is not a universal rule for every menu.In these expressions,
#916'sitem,itemtitle, anditemunitare read by position, whileitemdescis read by function number. Different subscripts are intentional.Here,
itemunitstores interface attribute text, anditemdescstores action attribute text. They do not mean a physical unit or ordinary help text in this design. Follow the code that reads a field to establish what it means.5. How mainInit and parampage prepare the existing buttons
So far we have followed what changes after a menu selection. We also need to answer: At startup, before anyone right-clicks a button, how does it acquire its previously saved function? This is where
env/mainInitbelongs.5.1 Distinguish main from mainInit
The standard standalone startup follows this sequence:
Order Responsible part What happens 1 Application parameter loading Loads base parameters and a valid backup, bringing saved function selections into the current parameters 2 env/mainPrepares the initial page and first-load flags, then requests the main window with MarcoDialog "/env/dmec-app-black.ui"at the end3 First timer handling after the main form is created The application calls env/mainInitto apply current function attributes to buttons that now exist4 Later page-entry actions, such as selecting Parameter The page script loads its required areas and prepares their buttons using that page's configuration mainandmainInitare different files. The former prepares the window request; the latter applies runtime attributes after the interface exists. A widget must exist beforesetWidgetAttributecan find it by object name. This is why moving the button-setting statements ahead of window creation can prevent them from taking effect.The automatic
mainInitcall is built into the application; users do not add it to every button. In the standard standalone branch, the main form's first timer handling calls thetimerscript before callingmainInit. A flag at the call site limits this automatic initialization to once per main-form instance. Later timer handling does not repeat it each time, and ordinary page changes do not rerun it.This describes the standard standalone branch. Other application modes, including clients, select initialization scripts differently in the source. Do not assume every mode calls the same
mainInit.5.2 How mainInit turns saved selections into buttons
The file performs three groups of function-key work in this order:
Work Parameters used Number processed Prepare Program shortcut actions Reads functions from #914and writes#9995.itemdesc12 entries, positions 0–11Prepare the bottom Program function keys Object names, selected functions, and position attributes in #91412 buttons Prepare the right-hand manual controls Object names, selected functions, and position attributes in #91136 buttons, positions 0–35The original statement for the first position in the first group is:
#9995.itemdesc[0]=#914.itemdesc[#914.item[0]]It reads
#914.item[0]to find the function selected for the first Program position, then copies that function'sitemdescinto the first shortcut record. The following positions, 1–11, use the same operation. Program uses#914; Parameter uses the#916table discussed earlier in this chapter.The complete statement for the first button in the second group is:
widgetFunc["setWidgetAttribute",#914.itemtitle[0],"",#914.itemdesc[#914.item[0]]+#914.itemunit[0]]It finds the button named by
#914.itemtitle[0], joins the selected function's attributes to this position's attributes, and applies the combined text. That text determines its actions, displayed caption, and right-click configuration entry.The first right-hand control in the third group uses the same approach with
#911:widgetFunc["setWidgetAttribute",#911.itemtitle[0],"",#911.itemdesc[#911.item[0]]+#911.itemunit[0]]These statements are excerpts from three separate groups, not three consecutive lines in the file. The original file lists every position individually; each button does not need its own separate action script.
Here, initialization means applying the currently loaded selections to the interface. If a right-hand position was saved with a different function,
mainInitreads that selected number. These statements neither reset all positions to factory assignments nor execute their business actions. The previous selections must, of course, have been saved successfully.The end of
mainInitalso configures the main menu according to the tool-magazine setting, logs an existing machining-file selection, and conditionally synchronizes virtual-machine parts. It therefore performs other main-interface preparation as well. This lesson concentrates on the three function-key groups above; rerunning the whole script merely to refresh one button would repeat its other work too.5.3 Why the Parameter page still needs parampage
mainInitprepares the Program function keys and right-hand controls already present in the main interface. Parameter's bottom button UI is loaded on entry to that page, soparampagehandles the next part. The two scripts prepare different areas; neither can be omitted.The following original lines in
env/parampageload the bottom area:IF#824.version==1GOTO10 #824.version=1 #824.itemdesc[0]="/env/param/paramfunc.ui" widgetFunc["QFrame","paramFuncFrame","refresh",""]This follows the same approach as the Program page's subpages: check whether the area has been prepared; on first entry, put the UI path in the parameter and load it into the specified frame.
maininitially sets#824.versionto0, marking this area as not yet loaded for the current startup.parampagelater changes it to1; it does not mean thatmainInithas already prepared this area.The script then assigns attributes to all 12 buttons. This line handles the third position:
widgetFunc["setWidgetAttribute",#916.itemtitle[2],"",#916.itemdesc[#916.item[2]]+#916.itemunit[2]]With the example's new assignment, it finds
paramFuncButton3and joins the attributes for function 5 to those for the third position. The combined text becomes that button's attributes.The four arguments used here are the operation name, widget object name, an empty third argument, and the complete attribute text.
setWidgetAttributereplaces the button'saccessibleDescriptionand parses it again. It changes more than the visible caption. The object name must match a widget that has already been loaded; changing a parameter does not compensate for a wrong or missing object name.In Qt Designer, some static captions in
paramfunc.uidiffer from the running page. For example, the original third button contains the Chinese manufacturer-parameter/F3 placeholder. The page script replaces that setting using the current assignment. Continue to the script when investigating a live button; its Designer caption alone is insufficient.6. Why a button combines two attribute texts
First read the complete existing action attributes in
#916.itemdesc[5]:-C((#319.item3==1||#319.item7==1)&&(#1026.item[0]!=2)) -E0 -A: (MouseButtonRelease:/env/funcscripts/deployComponents[1]) -A: (keyReleaseEvent:/env/funcscripts/deployComponents[1])The first two lines disable the button when condition 0 is true. The last two assign the deployment script to mouse release and key release. In these UI event paths,
[1]selects the auxiliary Qt script channel; this file is not being called as an NC program.Next read the complete attributes for the third position, stored in
#916.itemunit[2]. The quoted string below retains the actual line break from the configuration:-T(#9995item2+" "+#915.itemtitle[#916.item[2]+2]) -T("") -C,1(#916item2==0) -C,0(1) -A: (rightClickedEvent:/env/param/paramfuncmenu[0](#916=2<<#915=#916item2)) -DThis text handles three practical needs:
- What to display. The first text combines the key name
F3, a line break, and the function name. The second is empty. A function number of 0 selects the empty text; otherwise, the first text is used. - How to configure the position again. Right-clicking records the position and current function, then calls the shared
paramfuncmenuscript. - How the text stays current.
-Dkeeps the display dynamic.
This is why an empty button retains its configuration entry, and an assigned Deployment button can still be reconfigured.
#916item2and#9995item2are the compact forms found in the original attributes. They read item 2 in these expressions. You do not need to rewrite every original UI expression into ordinary script notation.Once the two texts are joined, all their
-Centries belong to one condition list. The0in-E0identifies a condition; the1in-C,1identifies a text entry. Neither identifies a function-key position. If these attributes are later changed, check the numbering in the combined text. Omitting the position text loses both this example's caption rules and its right-click entry.7. How right-clicking identifies the position
The right-click event above first sets
#916to2, copies that position's current function number into#915, and then calls/env/param/paramfuncmenu.The
<<separates the two preparation assignments, which run before entering the script. The completeparamfuncmenufile contains three lines:IF#1026.item[0]!=2GOTO1 widgetFunc["PopMenu","","",915] N1If the identity is not 2, execution jumps to the end. Otherwise, parameter 915 is used to construct the menu. The fourth argument to
PopMenuis the menu parameter number, not a UI filename or button position.For the third position, the two main values are:
Moment #916#915Just after right-clicking the empty third position 20After selecting Deployment in the menu 25All 12 positions share this script. The position written before the call identifies the target. These are shared parameters; this design completes one configuration interaction at a time. It does not give every open window a private copy of the values.
8. How menu availability and selection work
The Deployment menu entry uses these fields:
Field Existing value or use #915.itemtitle[7]Deploymentin English; the corresponding Chinese name in the Chinese pack#915.item[7]Check-mark and availability conditions, shown below #915.itemdesc[7]/env/param/selmenufunc<<#915=5#915.itemversion[7]1, the Qt script-call setting used by this menu#915.itemmin[7]0, an ordinary menu actionThe complete conditions in
item[7]are:-C(#915==5) -R0 -C(#916item0==5||#916item1==5||#916item2==5||#916item3==5||#916item4==5||#916item5==5||#916item6==5||#916item7==5||#916item8==5||#916item9==5||#916item10==5||#916item11==5) -E1The first condition checks whether the current function is 5.
-R0uses that condition to show a check mark. In this menu it controls checking; do not apply a different widget's read-only interpretation.The second condition checks all 12 positions. If any position already uses function 5,
-E1makes the item unavailable. This explains both the checked-but-unavailable Deployment entry in Figure 2 and the need to clear F5 first.Selecting an available Deployment entry executes
#915=5and callsselmenufunc. This operation configures the button. The menu name does not mean thatdeployComponentsruns at this point.Also distinguish the menu's
itemversion=1from[1]in a UI event path: their numbering rules differ. Retain the standard settings instead of interchanging them. Menu handling arranges the Qt script call according to interpreter availability. The detailed rules are in the function-panel reference; for now, establish the difference between configuring a function and using it.9. What the four selection-script lines change
This is the complete
env/param/selmenufuncfile:#916.item[#916]=#915 #9995.itemdesc[#916]=#916.itemdesc[#916.item[#916]] #916.itemmin[#916.item[#916]]=#916 widgetFunc["setWidgetAttribute",#916.itemtitle[#916],"",#916.itemdesc[#916.item[#916]]+#916.itemunit[#916]]Substitute
#916=2and#915=5to read each line:Line Result here Purpose 1 #916.item[2]becomes5Records Deployment at the third position 2 #9995.itemdesc[2]receives#916.itemdesc[5]Assigns the same action attributes to F3 3 #916.itemmin[5]becomes2Records the position now occupied by function 5 4 paramFuncButton3receives its complete new attributesImmediately updates its caption and actions while retaining right-click configuration Here,
itemminrecords a position, not a minimum permitted input. Some functions look up their own current position to display the associated key name, so the standard script maintains that record too. Clearing the old position does not erase the old function's position record; assigning it to the new position updates that record to2.In the loaded configuration,
#916.itemmin[5]initially contains0, which does not match the original F5 position. Do not use this old record alone to locate the button:#916.item[4]=5establishes the original assignment. This menu selection brings both records into agreement at the third position.The main assignment values change as follows:
Stage Third position #916.item[2]Fifth position #916.item[4]Visible result Original layout 05Deployment at F5 Original position cleared 00Both positions blank Function assigned to third position 50Deployment at F3 10. Page changes, shortcuts, and the next startup
#9995.item[2]currently holds the key nameF3. Itsitemdesc[2]holds the action attributes for the current page. The selection script changes the latter; it does not replace the key name with the function name.Deployment defines both
MouseButtonReleaseandkeyReleaseEvent, allowing one function definition to serve the button and keyboard. If a definition only contains the mouse event, a working button does not establish that its keyboard action is defined too.On entry to Parameter,
parampageupdates all 12 shortcut records before checking#824.version. The original third-position assignment is:#9995.itemdesc[2]=#916.itemdesc[#916.item[2]]Thus, returning to the page updates its shortcut records even when the first-load UI work is skipped. The local verification switched to Program and returned, confirming that F3's button and record still refer to Deployment. Do not generalize this to every key on every page: the current
programpagescript only rewrites the first seven entries. Other cross-page key behavior needs separate checking.Button-disable conditions also do not replace checks inside an action script. The current full-attribute shortcut handling reads the key event without applying the button's
-Econdition as the same execution check. This lesson verifies the assigned action text; it does not press F3 or execute deployment.Finally, separate an updated display from a disk save:
Moment Current design Initial main-interface preparation mainInitapplies loaded#914/#911assignments to Program and right-hand buttons, and prepares 12 Program shortcut recordsSelecting a menu item The four lines update current parameters and the button; they do not save a file Normal exit sequence env/closecallswidgetFunc["SysFunc","","saveParamBak",0]to save a parameter backupNext startup Parameter loading reads base parameters and a valid backup; mainprepares the window request,mainInitprepares Program and right-hand buttons, andparampageprepares Parameter buttons when that page is enteredThis save-and-restore path has been traced in source, but a complete exit and restart was not performed here. Closing a menu is not proof of a successful save, and the isolated program's memory changes do not establish persistence in a customer's environment.
env/closealso handles spindle and coolant shutdown; do not run it separately merely to save a button-layout exercise.11. How this relates to the preceding probing example
The previous chapter's inner-hole probing function belongs to the manual-control area on the right. It uses different parameter tables and scripts:
Item Bottom function keys on Parameter Right-hand manual-control area Menu #915#910, including nested submenusAssignments and function definitions #916, 12 positions#911, 36 positionsMenu entry script param/paramfuncmenuprogram/ctrlfuncmenuSelection script param/selmenufuncprogram/selctrlfuncmenuThe right-hand area also records a position before selecting an existing function. The probing function is number
50; its menu name comes from the relevant probing submenu. Its absence from the current panel does not mean the function is undefined.However, the right-hand selection script has only two lines:
#911.item[#911]=#910
widgetFunc["setWidgetAttribute",#911.itemtitle[#911],"",#911.itemdesc[#911.item[#911]]+#911.itemunit[#911]]
It does not include this chapter's
#9995update or function-position record. Do not assume that the nth right-hand button corresponds to Fn. Empty positions also use identity-dependent visibility: developers can see and configure them, while other identities do not see them.After this chapter, the manual-control and nested-menu reference will be easier to follow: identify what stays the same and which fields differ. This section connects the designs without adding or running a probing action.
12. Check your understanding
- Why is Deployment initially unavailable when you right-click F3? Find the condition that checks its original F5 position.
- Why can an empty button still be right-clicked? Find the empty text and right-click event in its position attributes.
- Why does the third button use subscript 2 in one place and 5 in another? Explain the object name and function definition separately.
- Does selecting Deployment in the menu call
selmenufuncordeployComponents? Explain which user operation configures the function and which uses it. - Which steps belong to
main,mainInit, andparampage? Explain what restores the configuration on page return and after a restart, distinguishing current parameters, the displayed button, and saved files.
Use the symptom to choose where to look:
Symptom Check first Right-click does not open a menu Developer identity, whether the button is enabled, and whether position attributes retain the right-click event A menu function cannot be selected Whether another position already uses it, and any additional conditions for that entry Program or right-hand buttons retain static UI captions just after startup Whether their objects are loaded, the initialization script for the current mode runs, and object names match those read by mainInitA selection does not update the visible button Position number, object name, and whether the UI is loaded; changed parameters alone are insufficient The caption changes but the action is wrong The actual itemdescand combined attributes, beyond the static captionA reassigned button loses right-click configuration Missing position attributes from itemunit, or an incomplete replacement event definitionThe button works but its shortcut does not Whether keyReleaseEventis defined and the current page has updated#9995A shortcut changes again on returning to Parameter The current page writes its own function definitions into the shortcut records Chinese and English show different names Their actual language packs; this function is displayed as Deployment in English The layout is not retained after restart The complete save, exit, and backup-loading sequence Next, read Context menus and submenus, following the right-hand controls through names, icons, conditions and selection scripts. The main-screen axis menu then provides another example of the same approach.
Previous: Parameter windows · Next: Context menus and submenus · Reading guide
在线咨询 - Download
